
From what I can see, it looks great, Levi.
Seems you just extended each of them a bit?
Looks like you integrated them form-wise, but I can't tell for sure...


From what I can see, it looks great, Levi.
Seems you just extended each of them a bit?
Looks like you integrated them form-wise, but I can't tell for sure...
Ranked No. #1 in initial quality
Idiots, simply by being idiots, seem capable of achieving randomly bad things that are beyond the imaginings of sensible people.
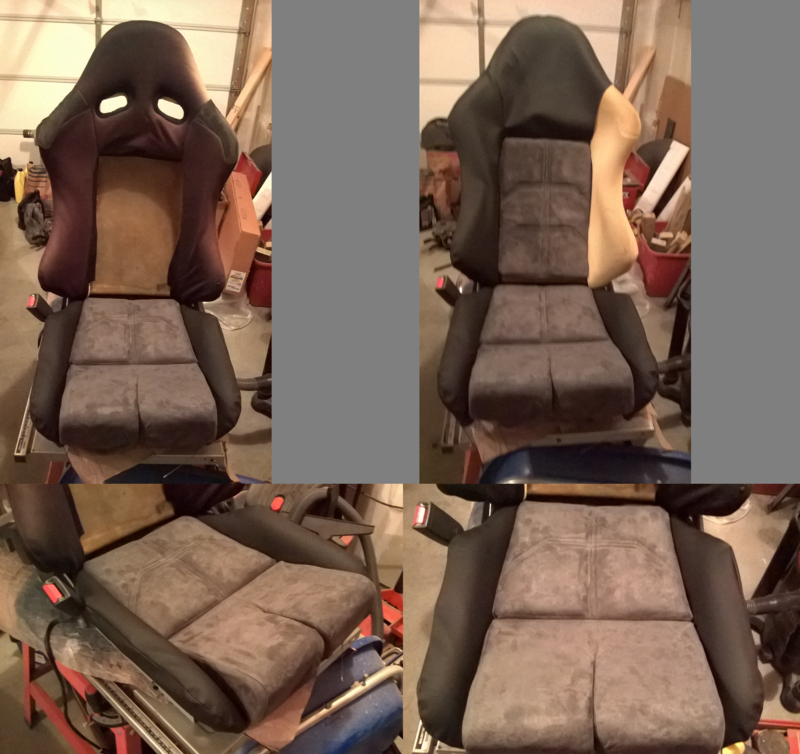
Looks great Levi! I dig the suede
I was finally was able to get some work done on my car. Finished up the tunnel and have the driveshaft tacked in as well! No pictures of the driveshaft but i took the stock driveshaft and removed the front section, chopped the second section, slapped a flange that accepts the gm universal joint on it, then connected the t56 input spline...bam.

Project LS3S - '94 Stealth
- Build thread on 3si http://www.3si.org/forum/f1/mdoe8s-n...72/?highlight=
Nice, looks factory!

Originally Posted by j2k4
 Thanks guys
I reduced the height of the sides on the seat bottom so I wasn't sitting down in as much of a bucket, and then I flared the side bolster supports outward. The seat bottom adjustment allows me to rest my right leg against the center console which is very helpful for any long drives. The trip to Bowling Green, KY last year made me realize how much I needed to make that change.
And the side bolsters needed widened as I have always had issues with them pinching my sides if I tried to sit in the car with a coat on. So rather than coming out straight like before the come out in a V-shape. I didn't have to extend anything but the whole process did involve a bunch of cutting on the stock seat parts.
I was worried these changes would hurt the ability of the seat to hold me in place but the results so far suggest that is not the case. I am really liking the dual texture of the vinyl and suede. I tried to get a little fancy with the stitching too. You can see in this photo the detail stitching on the seat back and seat bottom cushions. You can also see how bad some of the old material was.
Ah, I can see that much better - work PC leaves something to be desired, plus I'm going frigging blind.
Drove my 97 VR4 home today from C & A auto repair, Chai the master. New 3SX single pass aluminum radiator, upper and lower therma-flex hoses, thermostat, water wetter, cam seals, valve cover gaskets(old was leaking), OEM Plug wires, new plugs gaped to .28, TPS, changed out blue/red fuel rail loop for black one. Ran like a champ. Front bank 150/160/160, back bank 150/150/160 compression. Since I put it on the road in 2013 only did one hard launch on the stock clutch. I am a happy camper.
Test fit the interior. Put more than necessary together so that i could sit in it and make vroom vroom noises. Overall the clearance is fantastic, only a few changes.
1. Had to bend out the bottom of the metal bracket that holds the front of the passenger side tunnel carpet on to clear the trans tunnel. The result is the bottom of the carpet sticks out ~1/2". Nothing really and unnoticeable so i'm calling that a success.
2. The stock two piece radio bottom section will not fit, it hits the transmission tunnel. I have two options that i think would work. I can get a double din radio that is shallower on the bottom (cd is what gives it the depth) or I can just get a single din radio and put a storage thingy on the bottom. I'm going to look into oem double dins that are shallow enough.
3. The frame that mounts the center lower dash thingy (in between radio and console) does not fit. I will either have to modify that or just make a new one, i'm not sure. I may just put a couple basic braces on it and call it a day, I'm not too concerned about it. The only other thing i will have to address is mounting the rear tunnel carpeting as the stock console frame was used for that.
4. The gas pedal is the biggest issue, the rest is relatively simple and will appear oem 100%. The gas pedal needs more room because there is a big freaking tunnel in the way. I really only need to gain about 2" or so of width, but i'm not sure. I am going to likely take the clutch and brake assemblies out and bend them to the drivers side a bit. After putting them back in, I'll figure out the dead pedal, I may have to make a new one.
Very motivating seeing it mocked back up! Overall fitment is fantastic.

Test drove my 97vr4 today. The 3sx single pass radiator did its job, only did 140 or so and no leaks. Fast cool down time. Ready for west coast MOD on 07/09/16.
This last Friday my vehicle won a it's first trophy at Gary's Classic Car Friday's in Buena Park CA. It got washed and waxed recently as well. And today I got to replacing the hood pins on it.
CAM02407.jpgCAM02410.jpgCAM02411.jpg

Gutted a rear pre-cat to get the 3SX rear pre-cat delete out of my car. By the time the machine shop got the turbo flange milled flat, the flange was about 1/8 to 1/4" thinner, and causes my Stillen D/P to make contact with my T-case.

 Posting Permissions
|
3000gt.com 3000GT / Stealth International WWWboard Archive Jim's (RED3KGT) Reststop |
|
Team 3S 3000GT / Stealth / GTO Information daveblack.net |
|
Michigan 3S MInnesota 3S Wisconsin 3S Iowa, Nebraska, Kansas 3S |
North California 3000GT/Stealth United Society of 3S Owners 3000GT/Stealth/GTO Forums 3000GT/Stealth International |
|
3S National Gathering East Coast Gathering Upper Mid-West Gathering Blue Ridge Gathering |

 Reply With Quote


Bookmarks