Page 1 of 12 12311 ... LastLast
Results 1 to 10 of 113

Thread: Saved From The Crusher - 93 Stealth TT Rebuild/Restore

  1. #1
    Never finishes any verified

    Join Date
    Sep 2010
    Owner Since
    2001

    Location
    Wake Forest, NC
    Posts
    2,518
    Thanks
    51
    Thanked 197 Times in 140 Posts

    Thumbs up Saved From The Crusher - 93 Stealth TT Rebuild/Restore

    Copying over from 3si. Project started 08-25-2010, 08:20 PM

    So one of the local 3S Guys picked up a 93 Stealth TT last year with the intent to part it out and then scrap it. Well, I was lucky enough to get my hands on it before it went to the crusher! I hate to see these cars crushed especially a Stealth TT.

    So Mithrender, Stealthlabel and myself went and hauled it to my house last weekend. Since then I have been stripping what was left of the car down so I can do a full rebuild/restore of the car. I am going to be replacing, repainting, reconditioning every part of the car that I can.

    Ignore the rims! They were mounted just so it rolls.


    I love the glass top!


    Started stripping the interior


    The car is originally black so I have a nice base color to start with. The previous owner rattle canned the gray color so I have to sand it all off before I respray the car. I am going to be painting the car flat black with a satin clear. I am going to be using the parts from my 92 FWD/TT as I intend to make a nice Stealth tailor out of that car. I chose to scrap that car as I don't trust the frame with the TT engine since I cut the roof for the targa project.

    I started with the engine bay. I stripped out all that I could, decreased it and now I am getting ready to repaint it. I should have it sprayed in the next day or so.

    Engine bay stripped!


    All of the engine bay parts and wiring harness.


    Removed the buckets.


    Lots of surface rust


    Rust removed & primered, 2nd gen buckets welded in


    Prepping for engine bay respray


    Here is my list of current mods that I have lined up for the car "More to come":

    99 Conversion "Already welded in the new buckets"
    Evil Eye hood
    ABS Delete
    AWS Delete
    Intrax lowering springs "Already installed"

    Check it out on Youtube!!


    93 Stealth TT - The Stealth Project

    Renegade Tech Works ECS Controller on Intrax Springs
    Chrome ECU
    Hybrid 13g's
    EVO 560cc Injectors
    Spec Stage 3 clutch
    Ninja Performance Output shaft & Input spool
    Ninja Performance Solid Tensioner & Gates racing T-Belt
    CX Racing Dual Core FMIC
    Megan SS Exhaust
    Fidanza Cam Gears and Clear Covers
    3rd Gen Lifters
    HKS BOV
    K&N FIPK
    Maximal High flow converter
    Walbro FP & FuelLab FPR
    Maximal and Seattle Solid Mounts
    All -6an Lines
    Custom -6AN coolant neck lines
    AWS/ABS/Cruise Delete
    MP Rear Control Arms
    SS Brake Lines
    99 Front Conversion
    2nd gen Rear Bumper
    99 Combat Wing
    Complete interior LED Swap
    Skillard Fuel channel
    Oohnoo FPR Bracket
    .
    .
    More to Come......

  2. The Following 3 Users Say Thank You to DrGonzo For This Useful Post:


  3. #2
    Never finishes any verified

    Join Date
    Sep 2010
    Owner Since
    2001

    Location
    Wake Forest, NC
    Posts
    2,518
    Thanks
    51
    Thanked 197 Times in 140 Posts
    So I got around to spraying the engine bay today. I finished removing the last of the parts including the hood. Prepped the engine bay and sprayed to coats of primer. Then on with the color. Three coats of gloss black!

    I used Duplicolor Paint Shop lacquer. Not the rattle can shit! This is the paint can enamel you find at AutoZone that is premixed/reduced. I only use it in the engine bay as it really easy to work with and spray and it holds up really well! I sprayed my other Stealth's engine bay with it 5 years ago and it still looks great. It is really hard to chip the paint also so it is great for the engine bay! Since it is also a one stage it comes out looking really shiny as you can see in the pic's. Sorry they are a little bright. I constructed a make-shift paint booth out of my canopy and 3mil plastic which made it really bright.

    Click on the images for full res shots:


    I am going to start re-assembling the engine bay over the next couple of days. going to take some time as things need to be cleaned, re-sprayed, modified..etc! Plus I also need to start pulling parts off of the other Stealth to install on this one. I will update this thread accordingly!

  4. The Following User Says Thank You to DrGonzo For This Useful Post:


  5. #3
    Never finishes any verified

    Join Date
    Sep 2010
    Owner Since
    2001

    Location
    Wake Forest, NC
    Posts
    2,518
    Thanks
    51
    Thanked 197 Times in 140 Posts
    08-26-2010, 09:50 PM

    Engine wise it will be stock except still N/A 10:1 pistons. I have the TT pistons already but I don't want to do another engine breakdown just yet. The engine will be due for 120k tuneup in like 15,000 miles so I will just run the car on the N/A pistons until that time. Then swap them out when I have the engine torn apart. Just easier for me. Until I swap out the pistons I am not going to be doing any major engine mods. I will prep for later mods by doing some fuel, ignition and electronics.

    For the time being I am going to be doing an ABS and AWS delete. Once everything is complete and I thing the engine is running good and healthy I'll think about doing some power upgrades. My main goal is to just have a good healthy running AWD TT!

    08-27-2010, 10:23 PM

    So today I wasn't able to get much done. I was able to get the rear end dropped, the AWS removed, and the rear stripped apart. It was in really good shape jut really dirty. I didn't strip it down to the actual individual pieces as I didn't think it was necessary. I sanded down the small rust spots and treated them with rust converter. I will add a coat of rattle can black paint just to freshen it up some. I need to order new sway bar links as they are shot. Right now I am waiting for my heim joints to arrive so I can button up the AWS delete. I ended up using a rubber expandable plug as it is removable and easy to get in and out. I will make a metal bracket that uses the old pump mounting hole to actual secure it better.

    I only got a few pics as my battery in the camera died. I'll get more in the next day or so.


    08-30-2010, 09:32 PM

    I finished painting and cleaning the rear end today. I started to re-assemble it but I am still waiting on the Heim joints for the AWS delete and the sway bar end links. When I drained the rear diff the oil was really old and stank really bad. The drain plug had a lot of sludge and fine metal particles on it. I examined the gears and everything looks good. turns smooth and no binding! I am just wondering what type of gear oil to use in the rear dif? My debate is between the Valvoline Synth or Mobile 1 Synth?

    So what is everyone else using in their Rear Dif's?


    I also sprayed the 2nd coat of paint on the engine bay. Now that it is complete I can start re-assembling the engine bay. I have to re-wrap the wiring harnesses first as the wire loom is crap and falling apart. The I start on the non-ABS brakes! Yeah....

  6. The Following 2 Users Say Thank You to DrGonzo For This Useful Post:


  7. #4
    Never finishes any verified

    Join Date
    Sep 2010
    Owner Since
    2001

    Location
    Wake Forest, NC
    Posts
    2,518
    Thanks
    51
    Thanked 197 Times in 140 Posts
    08-31-2010, 09:17 PM


    I got the Heim joints in today from SpeedwayMotors.com. Really fast shipping and the quality is great.


    I am only missing the sway bar end links now and the rear end will be complete. I am still going to install it tomorrow as I have brake work that needs to be completed and the sway end links are easy to install.


    I also as able to get some of the engine bay items re-installed. Non-ABS prop valve and lines where installed along with the clutch and some of the A/C lines.


    Next on the list is repairing any issues with the body wiring harness and re-wrapping it with new electrical tape as the old tape is brittle and cracks easily.


    09-01-2010, 03:42 PM

    I used the same parts as are listed in this thread:

    http://www.3si.org/forum/f116/aws-de...-i-did-367862/

    Parts came out to like $95.00 including shipping. I picked up the bolts at a local hardware store. The joints are really nice and self lubricating from what I can tell. Shipping took like 2-3 days.

    I didn't drill out and retap the holes though. I used metric grade 8 for the x-member side and 1/2 grade 8 for the control arm side. You will need to open up the hole a little on the control arm as the 12mm bolt hole is just a tad to small for the 1/2 bolt.

    09-02-2010, 09:20 PM

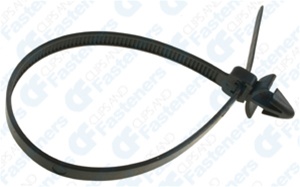
    So I didn't get to much accomplished today. I finished off the front body wring harness. The mailman brought me a gift today so I was actually able to install the harness. When I removed the harness I cut all of the old zip ties holding it to the frame. I had to order new ones and it took some time to hunt down. I finally found some that would work from a company called clipsandfasteners.com.


    Push Mount Cable Tie For Imports 200mm Length

    They hold pretty good in the think metal like the side frame by the wheels. Thinner metal they pop out if to much stress is applied. They are still the best fasteners I could find. After getting the harness attached I noticed the main power wire from the engine fuse box had oxidation pretty bad so I have to pick up some good power wire to replace the corroded one.

    Tomorrow I am going to try and remove the front steering rack so I can finish removing the AWS lines and plug up the holes. I may replace it with the N/A rack I have depending on it's condition.

    Once that is complete I need to start prepping the engine for removal from the other car and start pulling the interior as I need to wire in the new gauges and electronics into the new car.

  8. The Following User Says Thank You to DrGonzo For This Useful Post:


  9. #5
    Never finishes any verified

    Join Date
    Sep 2010
    Owner Since
    2001

    Location
    Wake Forest, NC
    Posts
    2,518
    Thanks
    51
    Thanked 197 Times in 140 Posts
    09-03-2010, 07:17 PM

    So I started to strip the front suspension apart to clean it up. Well, looks like I am going to have to replace most of it. Both tie rod ends are shot. The ball joints both need to have new boots "Ball joints are still good". The whole steering rack will have to be rebuilt. Sway bat ends are shot and I also may need a new wheel bearing. The Front Passenger bearing was a little loose but I was able to press the race back in to tighten it up. I believe it was caused by the car sitting for so long without axles.

    I am also starting to pull interior parts out as I need to wire in the electronics to the new dash. This weekend I hope to have the engine prepped to pull out of the other car sometime next week. I may have to hold off on dropping in the engine until I get all the replacement parts ordered and back on the car. Will be easier to put things like the steering rack/Swat bay back on with the engine out of the car...

    09-05-2010, 12:38 AM

    I was able to get the dash, engine wiring harness and all of the electronics out of the other car today. I was able to get the Prosport gauges mounted to replace the triple gauges and I was able to get the glow needles finished and installed.

    The glow needles are not a kit. I built these from scratch and installed them myself. And yes they are a pain in the ass!!!

    Needles installed:


    Night Shot:


    Testing the Glow needles and the gauges:


    Tomorrow I am going to try and get the engine wiring harness installed so that I can start working a little on getting the interior of the car back together. I am waiting on parts to show up so I can't really do much more work on the front end at this time.

    09-05-2010, 09:47 PM

    So even though I am waiting on parts to get the front steering and suspension completed. I actually got a lot done today!

    I started off by removing the TT harness from the other car and getting it installed in the new one. Spent some time removing some of the old tape and wire loom and re-wrapping it. I have one connector that I have to replace as I cut some wires on it to wire in the front O2 sensor on the other car. I have the connector I just have to wire it in.


    I also finished cleaning what was left of the front end. The inner wheel wells were coated with dirt/grease/???. I had to use a paint scrapper to get most of it off! Wire brush got the rest. Then degreaser and a nice fresh coat of under-body rubberizer!


    Since I had the wiring harness in, I was able to get the carpet installed. It is not the best looking but nothing a little steam cleaning won't take care of...


    And... since I had the carpet in I figured I might as well install the dash! Luckily I finished off the gauges the other day so there really was nothing left to do. I got it installed and then realized I forgot to change out the VIN plate...OOoops! So I had to pull the dash all over again to drill out the rivets and put in the correct VIN plate.


    I am unable to install the steering column as the steering rack is waiting on a rebuild. so it looks a little funny right now. The Apexi turbo timer is install right on the main gauge cluster and the SAFC in located inside the center console. I am debating on whether or not I want to install the pillar pod for the wideband and fuel gauge. I am thinking I might install them in the empty slot under the radio.


    I will most likely finish off the interior in the next couple of days. My seats are trashed so I am just going to use some cheap seat covers until I can save up the money to get the leather replaced.

    Tomorrow I am going to start pulling the last of the parts off the other car to prep the engine for transfer. I also need to remove/install things like the sidemounts, oil cooler, etc.

    Car is coming together 1 piece at a time!!!

  10. #6
    Never finishes any verified

    Join Date
    Sep 2010
    Owner Since
    2001

    Location
    Wake Forest, NC
    Posts
    2,518
    Thanks
    51
    Thanked 197 Times in 140 Posts
    09-09-2010, 07:36 PM

    Well I finally got the engine pulled from the FWD TT. I even broke one of the wheels on my engine hoist doing it. Stupid cheap bots holding the front wheel broke and the metal base for the wheel bent. This made it an absolute pain in the ASS to move the lift after I hoisted up the engine. I need to go get some washers to mount the engine to the engine stand. all of the ones I have are to damn small! I forgot how long the transfer case bolts are....

    I decided that I am not going to rebuild the TT steering rack but instead use the one from the N/A. It is in really good condition just needs the bellows replaced, Which I got lucky and Pep Boys had 2 kits for $18.00 each!

    I also got all of my suspension parts in today so I will be getting the front suspension put back together tomorrow.

    I have to pull the front and rear valve covers as I noticed them leaking a little oil. Other than that the engine looks nice and clean. I don't know why the some of the pullys have rust on them. the engine hasn't run in some time so I am pretty sure it's just surface rust. I'll clean them up and reinstall them before I drop the engine into the TT frame. ll of the belts are brand new so no need to replace any of them.

    Here are some of the pics I have from pulling the engine:


    Engine sitting on tires as I can't mount it to the engine stand due to lack of correct size washers!
    "Hoist is taking some of the weight off so nothing is getting crushed/damaged"


    09-10-2010, 07:24 PM

    @Lawdogg - I just found out that this was the frame you were wanting to get at one point...LOL

    So I was able to get the front suspension back together with all fresh tie rods, Sway bar links, ETC. I even got all of the steering back on the car, The N/A steering rack cleaned up real nice and is not leaking at all. Put new bellows on it and it's looking good.

    Does anyone know if the stock steering rack is made by Koyo? As that was the rack I just installed. I'm wondering if it was replaced prior to me getting the car 10 years ago!

    I got pics of everything but I havn't gotten them upload. I'll get them uploaded later on tonight or tomorrow.

  11. #7
    Resident Gamer
    Join Date
    Sep 2010
    Owner Since

    Location
    Godwin, NC
    Posts
    48
    Thanks
    2
    Thanked 1 Time in 1 Post
    damn talk about getting alot done to it in such a short period of time. Hope it turns out how you want it to

  12. #8
    Forum User
    Join Date
    Sep 2010
    Owner Since

    Location
    Cleveland, Or Louisville depending on time of year
    Posts
    14
    Thanks
    1
    Thanked 0 Times in 0 Posts
    looks AWESOME! back to your earlier comment about the glass roof, yea they are pretty sweet, until the edges dry rot also if you have anything in the trunk you cant take the top off but yea i really like my sunroof!!!

  13. #9
    nice restore. looking forward to see more pics ...

  14. #10
    rawr. verified
    Join Date
    Sep 2010
    Owner Since
    August 2009

    Location
    San Diego, CA
    Posts
    1,119
    Thanks
    21
    Thanked 29 Times in 23 Posts
    DRGonzo, how do you like the prosport gauges? I went with aem gauges instead.

Bookmarks

Posting Permissions

  • You may not post new threads
  • You may not post replies
  • You may not post attachments
  • You may not edit your posts
  •  
The 3000GT/Stealth/GTO Web History Project
3000gt.com
3000GT / Stealth International WWWboard Archive
Jim's (RED3KGT) Reststop
3000GT/Stealth/GTO Information and Resources
Team 3S
3000GT / Stealth / GTO Information
daveblack.net
3000GT/Stealth/GTO Clubs and Groups
Michigan 3S
MInnesota 3S
Wisconsin 3S
Iowa, Nebraska, Kansas 3S
North California 3000GT/Stealth
United Society of 3S Owners
3000GT/Stealth/GTO Forums
3000GT/Stealth International
3000GT/Stealth/GTO Event Pages
3S National Gathering
East Coast Gathering
Upper Mid-West Gathering
Blue Ridge Gathering