If you have rusted, nasty, snapped off fuel pump assembly studs on your gas tank, and have a nasty, rusted, leaking hard line out of the fuel pump assembly itself, and a poorly sealing fuel pump assembly gasket, this may help you out.
I didn't snap any pictures of before my conversion but trust me, it was nasty. Only 3 of the 6 fuel tank studs were in decent shape, the top of the fuel pump assembly was rusted and disgusting, and to top it off my fuel pump assembly gasket was not even close to making a seal on the top of the tank.
Tools Needed:
1 - Standard Mitsu tool set, with your 10mm, 12mm, and 14mm sockets etc.
2 - Air or electric grinder / cutter.
3 - Air or electric drill w/ pilot bit, bit for M5 or 10-24 bolt, and bit for -6 AN bulkhead.
4 - Adjustable wrenches.
Parts Needed:
Fuel Pump Assembly:
1 - 1 x -6 AN 90 degree bulkhead fitting.
2 - 1 x -6 AN braided S/S fuel hose, order 1 foot but cut to about 7-8 inches.
3 - 2 x -6 AN swivel hose fittings
4 - 1 x -6 AN male to M14 x 1.5 female adapter
5 - 1 x -6 AN nut
6 - 1 x nylon washer
7 - 1 x rubber washer
8 - 1 x 3/8" x ~5 lg. high pressure rubber fuel hose
9 - 2 x 3/8" hose clamps
1 - -6 AN female to 3/8 barbed fitting
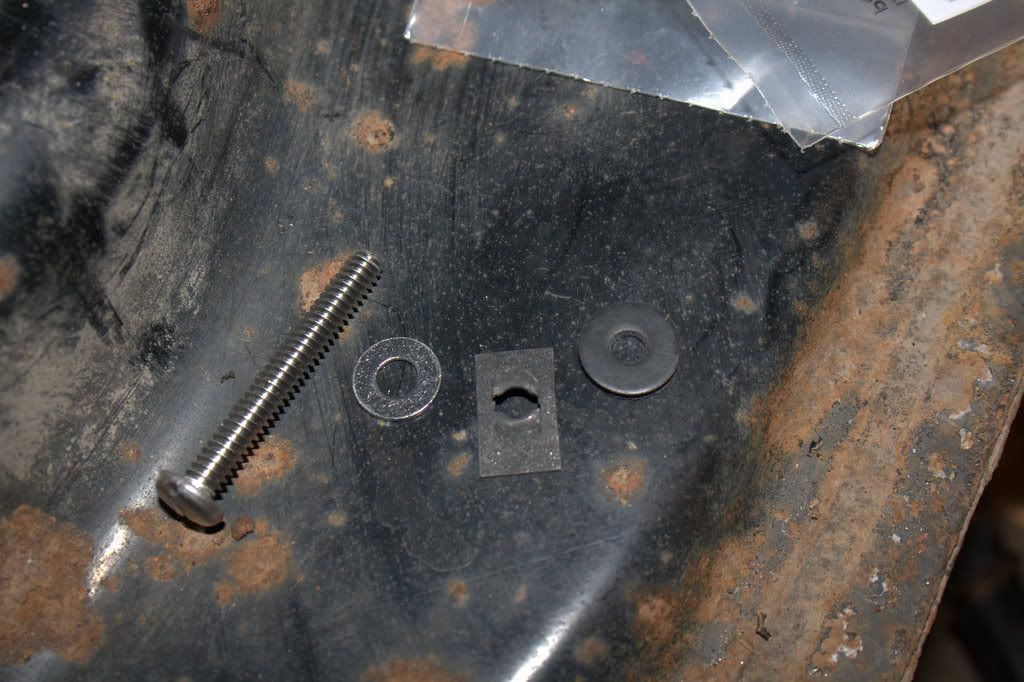
Fuel Tank (can also use M5 hardware, but Lowes didn't sell M5 flat washers so I had to use 10-24 screws):
1 - 6 x Screw, 10-24 x 1.5" lg.
2 - 6 x rubber washer
3 - 12 x S/S washer
4 - 6 x Nut, 10-24
5 - 6 x flat washer for 10-24 thread (shown in pics below)
Here's what I did (gas tank):
1. Pull the fuel tank. Check here
Stealth 316 - Fuel Pump Removal to see how you can disconnect the fuel pump wiring - I found it easier to simply disconnect the fuel pump wiring and drop the tank with the fuel pump assembly in it. In addition to disconnecting the fuel pump assembly, there are also 2 small lines to disconnect near the fuel feed line underneath the car, the fuel filler hose must be disconnected (I had a new one on hand and had to cut the old one off), the fuel filler hose guard must be removed (mine crumbled to pieces, and mitsu does NOT make this part any more), and there is a big hose underneath the car that needs to also be pulled (not even sure what that one is for). If you have any fuel in the tank (which you will - remember, when the fuel light comes on you still have 2 gallons!) - there is a drain screw on the p/s bottom of the tank where the remaining fuel can easily be drained. Then take off the 5 14mm nuts holding the fuel tank up (you may have to remove your exhaust first ... my ICH single shot allowed easy access) .. the tank should drop right out. If it doesn't, STOP and inspect for anything you haven't removed ... or that I may have forgotten to tell you about.
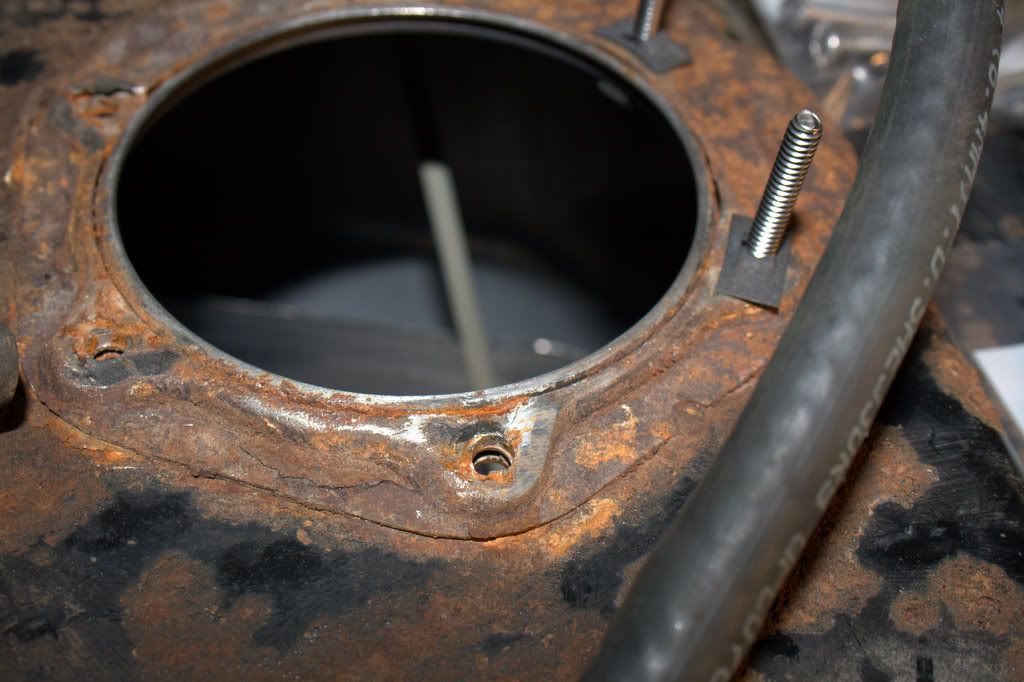
2. With the fuel tank out, and the old fuel pump assembly removed, now it's time to get rid of those old nasty studs. BEFORE YOU EVEN THINK ABOUT WELDING, GRINDING, DRILLING, OR SANDING YOUR GAS TANK, REMOVE ALL GASOLINE AND GASOLINE VAPOR FROM THE TANK. IF YOU DO NOT, YOU MAY CAUSE AN EXPLOSION THAT WILL END YOUR LIFE. So, I used a garden hose and filled the tank with water after draining the old gas and rinsing it thoroughly. With the tank full of water, I took a cutting / grinding wheel and removed any trace of the old nasty studs. Grind them down flat with the surface below.
3. Now, take your small pilot bit and drill a pilot hole in the centers of where your studs used to be. Then, follow it with a bit suitable for your hardware, M5 or 10-24 (or 10-16) - any bigger will require boring of the fuel pump assembly & gasket thru holes. Now with your holes drilled, you can take some sandpaper and clean up the gasket mating surface on the tank. Mine was nasty as hell and I grabbed some fine sandpaper and shined it up again.
4. Drain the water from the gas tank. Make sure you get all the water out, you'll have to flip the tank and wrestle with it ... and then use a sponge or towel to soak up what's left. I hit it with an air gun afterwards to make sure it dried out completely before having a chance to rust, and then let it sit in the hot sun to bake and evaporate out the rest of the moisture. Be sure to get all bits of metal, bits of rust, or bits of anything else out of the tank that might be in there.
5. Now, gather your materials to run the screws up through the tank. I put a metal washer on first, then the rubber one, fed it up from under the tank, and put the flat nut on the top. There's no need for a rubber washer on the outside of the tank, since it isn't a sealed surface anyway.
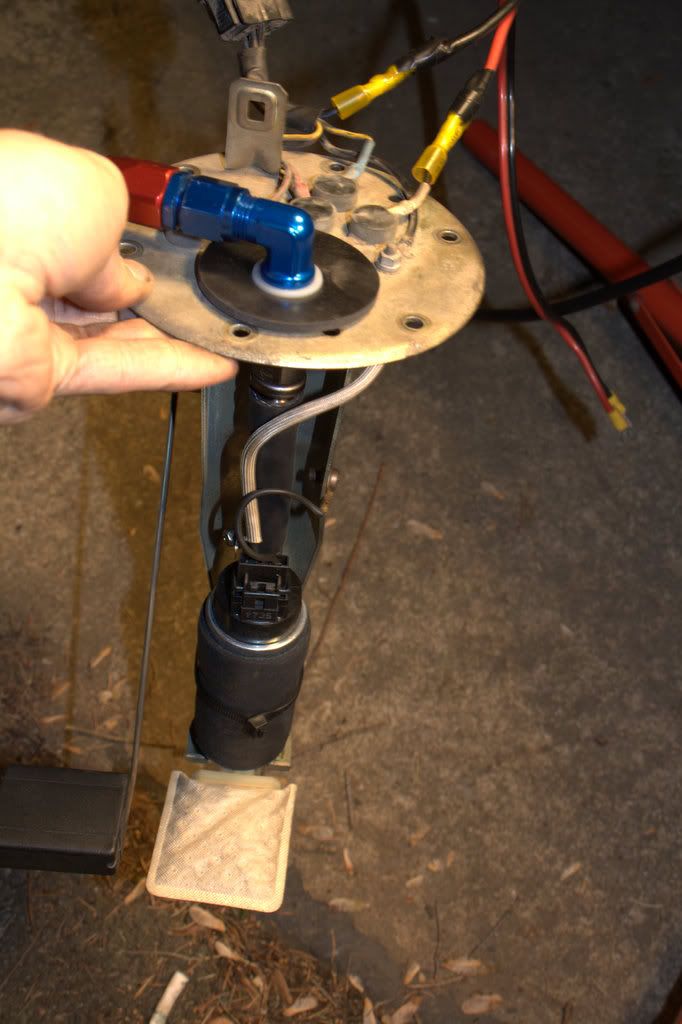
Now you're ready for the fuel pump assembly. But first let's look at how to convert it (and I apologize for not taking more pics through the entire process):
1 - With the fuel pump assembly out of the tank, you should see your fuel pump at the bottom (likely zip tied) with a hard line on the top, going up and out of the fuel pump assembly. Remove the screw on the bottom of the unit, holding the bracket which supports the pump. Unclip the pump and set it aside (you will not need any of the plastic pieces / o-ring between the pump and hardline). Now you are ready to cut the hardline out of the fuel pump assembly since you cant really get to the bottom piece, cut the top piece off. Then drill through it with a bit big enough to fit the -6 AN bulkhead, and the bottom should fall out.
2 Now that your fuel pump assembly is ready for the AN stuff, first assemble your AN line. I used the full foot of -6 line I ordered, but it turned out that was way too long. I would suggest cutting it down to around 8, that should work a lot better. I found it easier to put the -6 AN to M14x1.5 adapter on the stock hardline first (hold on read below), and then screw the S/S line onto the adapter. Then, feed your bulkhead through the hole where the hardline was with the nylon nut and rubber washer on it (in that order).
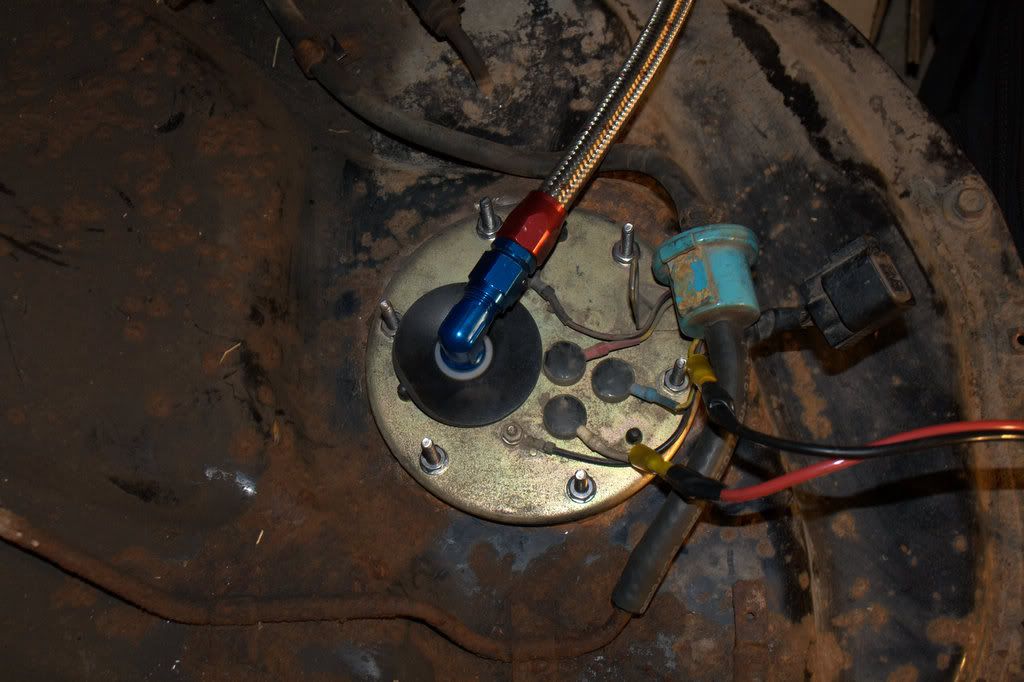
3 - Underneath, put on your nut to hold the bulkhead and seal the rubber washer up top. Put your 3/8 fuel hose onto the barbed fitting, and then fix the barbed fitting onto the end of the bulkhead. Slide the other end of the hose on top of the fuel pump outlet (its a great fit) and tighten down the hose clamp to ensure the seal. Screw the lower bracket back in to hold the fuel pump in place, and zip tie the pump to the metal extension arm of the fuel pump assembly. Up top, fix the s/s line swivel fitting to the bulkead. Now youre done and it should look something like this (excuse my way too big rubber washer, I was lazy):

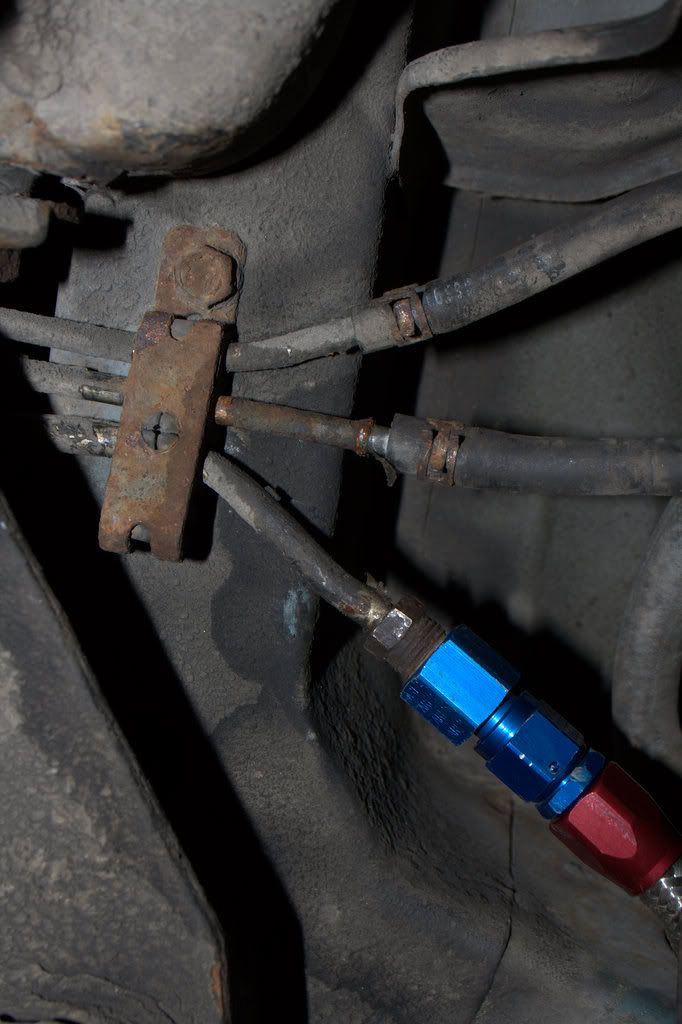
4 Now, the issue I encountered was this: The stock hardline under the car is a flared fitting, that has a male threaded nut that seals onto the flare when you tighten a fitting on top of it. With the -6 AN to M14x1.5 adapter from Jegs, there was not enough M14 x 1.5 thread inside to pull the nut on the hardline over the flare. Check out this pic, you will see the thread end inside of the adapter:
 EDIT DO NOT USE DIESEL INJECTOR SEALS, THEY WILL DESINTIGRATE! FIND FUEL INJECTOR SEALS ... FOUND THEM AT NAPA, FOR A SUZUKI SOMETHING OR OTHER

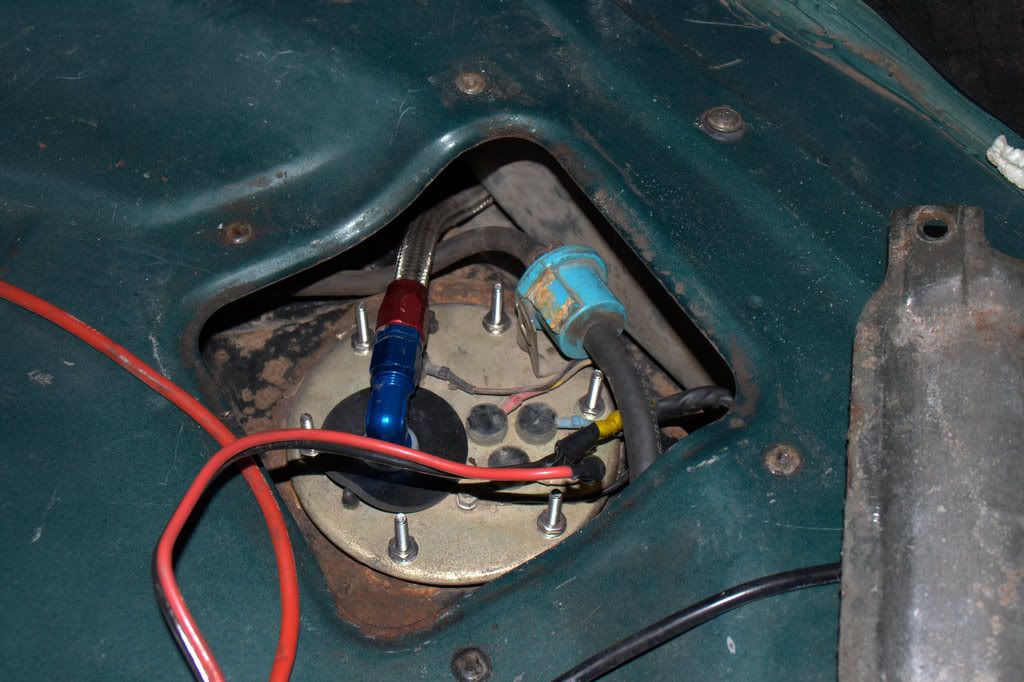
So, with the o-ring spacer thing-a-ma-bob inside the adapter, it went back on the car and should look like this:


Originally Posted by lawdogg
 If you have rusted, nasty, snapped off fuel pump assembly studs on your gas tank, and have a nasty, rusted, leaking hard line out of the fuel pump assembly itself, and a poorly sealing fuel pump assembly gasket, this may help you out.
 Reply With Quote
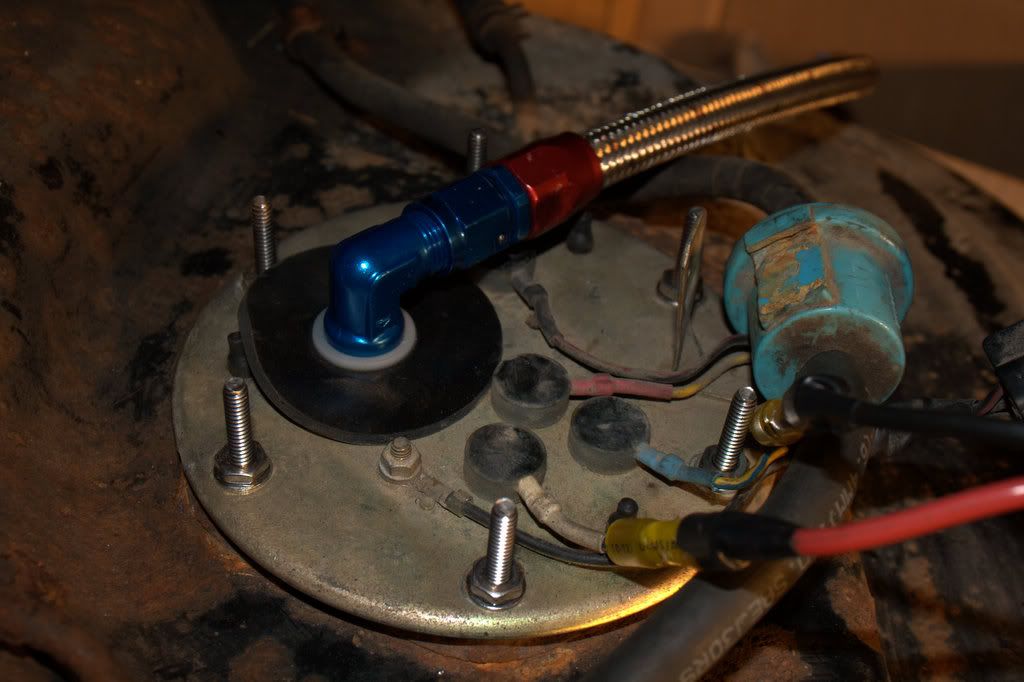


Bookmarks