

Originally Posted by 2fnloud

Yup thats the one.
If all you want to test is connectivity then actually you don't need to get set up to burn the firmware - you can use the Arduino IDE by itself to test connectivity to the controller by using the terminal logger.
Here's what to do.
(1) Download and install the Arduino IDE from the link you found.
(2) Plug the Firmware cable into the controller so that the label on cable that says "front" is facing up relative to the controller if it laying flat and the LED's are facing up so you can see them.
(3) Now Connect the Firmware cable thru your extension and plug it into your laptop/computer USB port
(4) Now you need to figure out what COM port the USB cable ended up getting assigned - to do this on a windows OS - go into the "Devices & Printer"
And look for a new device that looks like this:
USB1.jpg
Then right click on the device Icon -> select Properties in the Pop up Menu and click on the Hardware Tab and it will show you the COM Port Assigned - In my example it's COM28.
USB2.jpg
(5) Now that you know the Com Port - Launch the Arduino Application and go to the Tools Menu->Port SubMenu and set the port to the port number of the USB Firmware Cable
You can ignore the Blank Coding Sketch that came up when the Arduino App launched - you won't be using it.
arduino1.jpg
(6) Now From the Arduino app - go again to the Tools Menu and select the Tools-> SERIAL MONITOR Submenu Command
arduino2.jpg
(7)The Serial Monitor Window will pop up and now you need to set the Baud Rate to 115200
arduino3.jpg
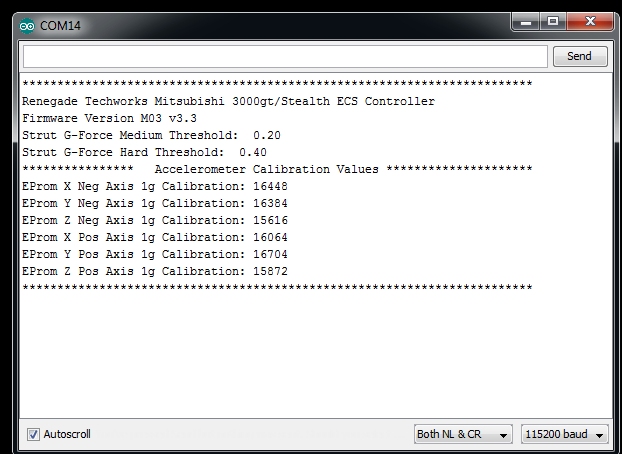
(8) Now that the Baud rate is set correctly you need to restart the serial Monitor. Close the window and restart it . I.e do Step (6) Again
The serial monitor will start and after a few seconds the controller should restart and display this in the serial monitor window if your connections are working:


 Reply With Quote


Bookmarks