Page 2 of 4 FirstFirst 1234 LastLast
Results 11 to 20 of 38

Thread: One thing leads to another and then another, now the engine is in pieces.....

  1. #11
    Never finishes any verified

    Join Date
    Sep 2010
    Owner Since
    2001

    Location
    Wake Forest, NC
    Posts
    2,518
    Thanks
    51
    Thanked 197 Times in 140 Posts
    Got the power steering cooler, oil cooler and coolant overflow tank mounted. Lots more room to work now without the damn evaporator in the way.


    Also working on getting the FMIC core mounted. IDK if it is just me but the core I got does not have the mounting bungs welded to the bottom to secure the bottom straps. It only has the top ones. So I'll have to fashion something up to help secure the bottom of the core. I still need to make some adjustments but need to wait till I can fit the bumper some to ensure it will clear certain things. The drop brackets I made to secure the upper bar that the kit comes with have some adjustability up and down.

    Check it out on Youtube!!


    93 Stealth TT - The Stealth Project

    Renegade Tech Works ECS Controller on Intrax Springs
    Chrome ECU
    Hybrid 13g's
    EVO 560cc Injectors
    Spec Stage 3 clutch
    Ninja Performance Output shaft & Input spool
    Ninja Performance Solid Tensioner & Gates racing T-Belt
    CX Racing Dual Core FMIC
    Megan SS Exhaust
    Fidanza Cam Gears and Clear Covers
    3rd Gen Lifters
    HKS BOV
    K&N FIPK
    Maximal High flow converter
    Walbro FP & FuelLab FPR
    Maximal and Seattle Solid Mounts
    All -6an Lines
    Custom -6AN coolant neck lines
    AWS/ABS/Cruise Delete
    MP Rear Control Arms
    SS Brake Lines
    99 Front Conversion
    2nd gen Rear Bumper
    99 Combat Wing
    Complete interior LED Swap
    Skillard Fuel channel
    Oohnoo FPR Bracket
    .
    .
    More to Come......

  2. #12
    Forum User
    Join Date
    Sep 2010
    Owner Since
    1998

    Location
    Easton, Pennsylvania, United States
    Posts
    2,042
    Thanks
    54
    Thanked 135 Times in 105 Posts
    They don't come with mounting points on the bottom. You run those flat metal pieces to hold the core up. The piping really holds it all in place.

  3. #13
    Never finishes any verified

    Join Date
    Sep 2010
    Owner Since
    2001

    Location
    Wake Forest, NC
    Posts
    2,518
    Thanks
    51
    Thanked 197 Times in 140 Posts
    Thats weird, The single core kit came with them attached to the bottom and top.

  4. #14
    There will be Blood! verified
    Join Date
    Sep 2010
    Owner Since
    1997

    Location
    In Sane!
    Posts
    4,677
    Thanks
    1,081
    Thanked 449 Times in 331 Posts
    Don't mind me, I'm just here for the shenz!

    Please continue...

    Help them, for they know not that which they do not know!
    CoopKill's Mistress Makeover Thread!
    "Punk, Nutswinging, Small Time, Asshat, Monkey, Jerkoff, Loser that rides on other peoples accomplishments!" . .

  5. #15
    Forum User
    Join Date
    Sep 2010
    Owner Since
    1998

    Location
    Easton, Pennsylvania, United States
    Posts
    2,042
    Thanks
    54
    Thanked 135 Times in 105 Posts
    Quote Originally Posted by DrGonzo View Post
    Thats weird, The single core kit came with them attached to the bottom and top.
    Correct. But the dual core does not. We usually fab up some brackets for the top of the intercooler and just install the 2 bars on the bottom to hold the intercooler up. The piping is fine to keep it all in place.

  6. #16
    Never finishes any verified

    Join Date
    Sep 2010
    Owner Since
    2001

    Location
    Wake Forest, NC
    Posts
    2,518
    Thanks
    51
    Thanked 197 Times in 140 Posts
    Yeah, the dual core came with a bar to mount the top. I cut the center vertical post from the bar to clear the 99 coolant tank and then fashioned up some brackets to mount it to the enter upper support section. The metal brackets they sent in addition are kind of flimsy, so I'll use some 3/16 flat bar, weld some vertical pieces to form a channel for the lower portion of the core to sit into. That will keep the bottom from moving around. Before I can build the bottom supports I need to get all of the piping in place to ensure alignment and then I can build the bottom mounting. Turbo shop said they should have the turbo's done this week so I hope to have them back before Christmas break. I have a week off that I can use to button everything up as long as I get the turbo's back in time.


    In regards to the A/C delete. I see a lot of debate about using idle pulleys and such. I don't want to use any sort of pulley as they are in some cases expensive, plus a pain to get at, and it's just one more thing to fail/replace. The only thread I have found where they did not use any sort of pulley uses a belt that is a bit too tight. They are using a 390-k6 belt or variant and stated the next size up was too loose 400-k6. I hit up some friends at Autozone and we did some searching in the computer and may have a solution. We found the 390 belt was actually something like 38 1/8 or something like that. We referenced a couple different brands and all were less than 39" So we looked to find an alternative and found the next size up was the 393-k6 belt which is a tad over 39". This should give the right amount of tension we need. I'm picking the belt up tonight and should know how it fits in the next day or so.

  7. #17
    Advanced Tech? verified
    Join Date
    Sep 2010
    Owner Since
    2006

    Posts
    938
    Thanks
    159
    Thanked 139 Times in 87 Posts
    Let me know if you want a NIB fabberge A/C delete kit. You can have it free.
    Maddog Performance Engineering

  8. #18
    Never finishes any verified

    Join Date
    Sep 2010
    Owner Since
    2001

    Location
    Wake Forest, NC
    Posts
    2,518
    Thanks
    51
    Thanked 197 Times in 140 Posts
    Quote Originally Posted by i3igpete View Post
    Let me know if you want a NIB fabberge A/C delete kit. You can have it free.
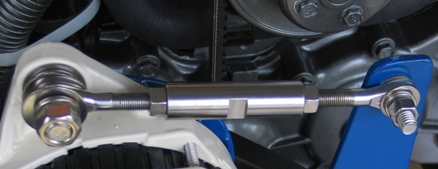
    Thanks Pete, But I think I'm all set. The Fab kit has the extra pulley which I don't want to have to deal with. I just want a straight belt. No pulleys to deal with. I already have the Alt bracket ground to clear the straight belt. I may possibly look into designing an adjustable rod setup like below that would eliminate the stock Alt bracket completely. Depends on how well this belt I get tonight works out.


  9. #19
    Never finishes any verified

    Join Date
    Sep 2010
    Owner Since
    2001

    Location
    Wake Forest, NC
    Posts
    2,518
    Thanks
    51
    Thanked 197 Times in 140 Posts
    So I got the belt and yep it fits. With the Alt and new belt on I have about 1/4-1/2" belt deflection which is about right i'm guessing. Can't really go off of the stock figures now seeing as the two points are further apart.

    So I did the basic grind to the Alt bracket so that the belt would clear with the new angle. Installed the Alt with just the lower most bolt where it was ground. Had to use a shorter bolt I had. Tighten it enough that you can still pivot the Alt:


    At this point install the belt. it will be loose so be sure it stays where it needs to in the next step.

    Using a prybar, stick it between the bracket and Alt to allow you to pivot the Alt into place. You only need to pivot it to get the second bolt on the belt side in. Don't try to get the two top bolts into place yet. Just pivot it up to get the second bolt in. The bracket mounted to the head will likely catch the Alt bracket as you pivot it up. I ground the edge down a bit to help it clear and also use a small screw driver to work the Alt bracket over that head bracket.

    With the second bolt in place screw it in but not tight as you still need to move the bracket again. The second bolt you put in moves the alt bracket closer to the top two holes so you can install those bolts. But it will not line it up 100%.

    Now you need a good long prybar. Stick it between the bracket and Alt right below the two top bolt holes. I found this to be the best pry spot. You can wrap duck tape around that area on the prybar where you are prying to help stop it from slipping. Muscle the Alt up and see if you can get one of the two bolts in place, if not tighten the upper belt side bolt a little more to pull the bracket closer.

    Once you get the two top bolts in place make sure the belt didn't move and tighten it all down.


  10. #20
    Forum User Not Verified

    Join Date
    Sep 2010
    Owner Since

    Posts
    331
    Thanks
    0
    Thanked 23 Times in 20 Posts
    On my DualCores I weld aluminum brackets that screw into mounting holes on the bottom of the front cross brace. You can just use regular metal straps and use very short screws into the core itself as the first row is outside air. Just make sure not to penetrate the second row.
    Attached Images Attached Images
    "Life should NOT be a journey to the grave with the intention of arriving in an attractive and well preserved body, but rather to skid in sideways, chocolate in one hand, martini in the other, body thoroughly used up, totally worn out and screaming "WOO HOO what a ride!"

    ----------------[2007 Ride of the Year.................................. 3.5 Stroker I did. w/DBB DR1000's

Bookmarks

Posting Permissions

  • You may not post new threads
  • You may not post replies
  • You may not post attachments
  • You may not edit your posts
  •  
The 3000GT/Stealth/GTO Web History Project
3000gt.com
3000GT / Stealth International WWWboard Archive
Jim's (RED3KGT) Reststop
3000GT/Stealth/GTO Information and Resources
Team 3S
3000GT / Stealth / GTO Information
daveblack.net
3000GT/Stealth/GTO Clubs and Groups
Michigan 3S
MInnesota 3S
Wisconsin 3S
Iowa, Nebraska, Kansas 3S
North California 3000GT/Stealth
United Society of 3S Owners
3000GT/Stealth/GTO Forums
3000GT/Stealth International
3000GT/Stealth/GTO Event Pages
3S National Gathering
East Coast Gathering
Upper Mid-West Gathering
Blue Ridge Gathering