Page 12 of 19 FirstFirst ... 21011121314 ... LastLast
Results 111 to 120 of 181

Thread: Widebody VR4 Build

  1. #111
    VR-3747 :D Not Verified
    Join Date
    Sep 2010
    Owner Since
    2008

    Location
    Dayton Ohio
    Posts
    1,792
    Blog Entries
    1
    Thanks
    19
    Thanked 123 Times in 86 Posts
    Quote Originally Posted by FeaRpb View Post
    Who sold you that crap?

    FreddyKreuger I think his name is. He claims to not have seen it all messed up. He refunded me the machine shop costs to straighten and reweld the manifolds, and offered to refund the turbos too, but I'm ok with the 3076's. All in all, I have a little under $2000 into the T3 setup and got my money out of the TD05 setup, so not bad.

    Quote Originally Posted by NOMIEZVR4 View Post
    you can thank me for that progress
    Lol you were a factor


    The 3076's are 500+ hp turbos whereas the DR1000's are 450hp turbos at best. Record is 814AWHP at 35psi on them...

    I'm hoping to pump out 800 from these, so at least I shouldn't have to push everything to the very limit in order to do it. I plan to keep timing pretty conservative and let the turbos do the work
    Last edited by futurevr4man; 09-18-2017 at 11:26 AM.
    rise and rise again until lambs become lions

  2. #112
    BAD ASS - I've got one Not Verified
    Join Date
    Sep 2010
    Owner Since
    2/2010

    Location
    L'Anse, MI
    Posts
    2,476
    Thanks
    1,262
    Thanked 594 Times in 488 Posts
    You'd better do a genealogical work-up on those turbos.

    Studies have shown that, while they can make a lot of power, many of them underachieve, preferring to sit around, snack, and play videos.
    Ranked No. #1 in initial quality

    Idiots, simply by being idiots, seem capable of achieving randomly bad things that are beyond the imaginings of sensible people.

  3. #113
    VR-3747 :D Not Verified
    Join Date
    Sep 2010
    Owner Since
    2008

    Location
    Dayton Ohio
    Posts
    1,792
    Blog Entries
    1
    Thanks
    19
    Thanked 123 Times in 86 Posts
    So I tried to start it this weekend. Ran into a few snags but had a few victories.

    Got the intercooler piping finished with the mock up. Nothing is really done (not to my standards anyhow) but it's together. Battery in, fuel hooked up, etc. etc. Still need to finish my preturbo intake pipes (tomorrow probably).


    So I went to crank it in order to build oil pressure and when I cranked it over the first time I saw some smoke come up from the front. Super concerning obviously. I didn't have any plug in it, so should spin no sweat... no compression. Well, turns out the engine wasn't wanting to turn and the smoke I saw was the starter.

    Obviously concerned, I chatted with the some friends and one of them convinced me the clutch was probably bound up. I've never had that happen in the 5 or 6 times I've gone through this process... but this is the first dual clutch I've ever messed with. So bled the clutch and it spun over just fine... built oil pressure to the 3rd tick.

    So that brings me to starting it. I had to flash on the new tune and dumbass me didn't have the MFI relay plugged in (for oil pressure cranking) and didn't plug it in afterward. So I chased my tail for like 3 hours trying to figure out why my tactrix wasn't getting battery power. Finally came to the conclusion I was an idiot. No surprise.

    Flashed on new tune, no problem. Got EvoScan connected to start logging, no problem. Got my big girl panties on and hit it... nothing. No firing. I had my neighbor at the ready with a fire extinguisher haha. Concluded I wasn't getting fuel (couldn't hear the pumps turn on). Found out I had the trigger wire in the wrong spot after double checking everything else. So I tried again and found out my fuel line (the line itself) is leaking. I have new e85 safe line coming now, and I plan to redo the whole thing. I can't be 100% positive that the old line was e85 safe... I made it too long ago.

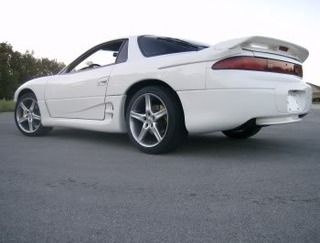
    So since I was stuck, I decided to have a Sunday funday. Got it on all 4's, started test fitting some stuff. Front has like zero camber. You can see the rears between the two pic... second one has a 15mm spacer on the rears. It should look good once it's all aligned and put together. It's all just laying on the body right now, nothing is lined up or anything, so take it with a grain of salt. I'm still excited about it.


    Wheels are 18x10 +20 P45R2's with 295/35/18 PSS's

  4. #114
    Member verified
    Join Date
    Sep 2010
    Owner Since
    2005

    Location
    Fowlerville, MI
    Posts
    1,251
    Thanks
    42
    Thanked 48 Times in 41 Posts
    Never thought I'd see the day....
    '92 Dodge Stealth RT/TT - Aug. 2012 COTM

  5. #115
    Member verified
    Join Date
    Sep 2010
    Owner Since
    Oct '08 - Oct '10

    Location
    Royersford, PA
    Posts
    3,814
    Blog Entries
    1
    Thanks
    1,059
    Thanked 442 Times in 317 Posts
    It has a bumper!
    R135
    ╚╬╬╝
    - 24

  6. #116
    VR-3747 :D Not Verified
    Join Date
    Sep 2010
    Owner Since
    2008

    Location
    Dayton Ohio
    Posts
    1,792
    Blog Entries
    1
    Thanks
    19
    Thanked 123 Times in 86 Posts
    The bumper is just sitting on there lol. I need brackets to actually mount it, and things need to shift around a bit. But yeah, it's right there!

    Doc, can you give me some insight on how I should get it aligned? I understand what all the individual adjustments do, but I'm not sure where to set them all from the beginning. How much camber, toe, etc? I'll take it somewhere that will set it to what I tell them.

  7. #117
    Member verified
    Join Date
    Sep 2010
    Owner Since
    Oct '08 - Oct '10

    Location
    Royersford, PA
    Posts
    3,814
    Blog Entries
    1
    Thanks
    1,059
    Thanked 442 Times in 317 Posts
    Go for -2 camber up front, -1.5 or so rear. I'd do a tiny bit of front toe-out and a tiny bit of total toe-in for the rear, maybe 0.1 OUT up front and 0.1 IN rear?

    As you add front camber you need to add a little bit of toe-out to correct for the self-steering effect of the camber and get better tire wear and more reactive steering.

  8. #118
    VR-3747 :D Not Verified
    Join Date
    Sep 2010
    Owner Since
    2008

    Location
    Dayton Ohio
    Posts
    1,792
    Blog Entries
    1
    Thanks
    19
    Thanked 123 Times in 86 Posts
    Noted, thanks!!

  9. #119
    Member verified
    Join Date
    Sep 2010
    Owner Since
    Oct '08 - Oct '10

    Location
    Royersford, PA
    Posts
    3,814
    Blog Entries
    1
    Thanks
    1,059
    Thanked 442 Times in 317 Posts
    If you plan on driving this primarily on the street without hitting up a ton of twisties or the light track/autocross use here and there, you'd be best to take half a degree out of the camber measurements only for tire wear reasons. I know you like twisties, but this will be a LOT of car for that, so...

  10. #120
    VR-3747 :D Not Verified
    Join Date
    Sep 2010
    Owner Since
    2008

    Location
    Dayton Ohio
    Posts
    1,792
    Blog Entries
    1
    Thanks
    19
    Thanked 123 Times in 86 Posts
    Bah! I ran it at -2* or so previously and it was fine!!

Bookmarks

Posting Permissions

  • You may not post new threads
  • You may not post replies
  • You may not post attachments
  • You may not edit your posts
  •  
The 3000GT/Stealth/GTO Web History Project
3000gt.com
3000GT / Stealth International WWWboard Archive
Jim's (RED3KGT) Reststop
3000GT/Stealth/GTO Information and Resources
Team 3S
3000GT / Stealth / GTO Information
daveblack.net
3000GT/Stealth/GTO Clubs and Groups
Michigan 3S
MInnesota 3S
Wisconsin 3S
Iowa, Nebraska, Kansas 3S
North California 3000GT/Stealth
United Society of 3S Owners
3000GT/Stealth/GTO Forums
3000GT/Stealth International
3000GT/Stealth/GTO Event Pages
3S National Gathering
East Coast Gathering
Upper Mid-West Gathering
Blue Ridge Gathering