Page 1 of 2 12 LastLast
Results 1 to 10 of 12

Thread: Great example of the filth I have to deal with.... Cleaning the Simple way!!

  1. #1
    Never finishes any verified

    Join Date
    Sep 2010
    Owner Since
    2001

    Location
    Wake Forest, NC
    Posts
    2,518
    Thanks
    51
    Thanked 197 Times in 140 Posts

    Great example of the filth I have to deal with.... Cleaning the Simple way!!

    Nope it's not one of those threads...

    So I get a lot of dirty nasty parts to work on. All of that nasty crap has to come off before I can do what I do. Cleaning parts takes about 80% of my time as they all have to be cleaned down to bare metal. I will not dip or coat on top of old paint, powder, garbage, etc!!

    For the longest time I was cleaning parts by hand, scrubbing them down one by one, washing and cleaning them in buckets, Etc. I live sort of in the country on a septic system so I am limited to the chemicals I can use. basically nothing can go down the drain unless I want to replace my septic system... So a lot of common cleaning chemicals such as bleach I can't use. The chemicals I do use that I can't dispose of here I take to the county landfill chemical disposal. They safely dispose of those chemicals for me.

    Some time ago I got myself a parts washer to try and make my life easier. Problem is I am limited on the chemicals I can use. I didn't want to use diesel or kerosene as they are highly flammable and I don't want an open vat of flammable liquid in my shop, that is attached to my house, in an area that I also frequently weld and grind in. So there went the idea of using most common chemicals.

    So I'm limited to water based chemicals for the tank. I tried various ones found at Homedepot, Lowes, some paint and automotive stores and all of the results where the same. None of them worked!! Some were also very corrosive to aluminum, etched and pitted them really badly. SO I also had to be careful of the chemical I used. Purple power I know works great, but will corrode the aluminum very fast.

    So I spent some time walking through HomeDepot one day in the cleaning aisle and the clerk was stocking up jugs of Simple Green.... Hmmm I have yet to try that stuff. I actually forgot all about it. I use it a lot in the house cleaning stuff as I know it is septic safe and safe around animals. So I bought about 5 jugs and headed home. Filled my 20 gallon wash tank with 5 gallons of simple green and topped it off with water. Tested out a few parts and was amazed at how well it worked. Needless to say I found my chemical!!

    So now when I get parts in, I strip them down, Brush off any loose dirt or whatnot, and drop them in the tank for a soak overnight. Next day I come out and use a chemical brush to brush the part some and break up the garbage and repeat. Usually they are completely cleaned in a day or so. This works great is I get the time back I spent cleaning parts to work on other things. The parts are almost self cleaning now...LOL

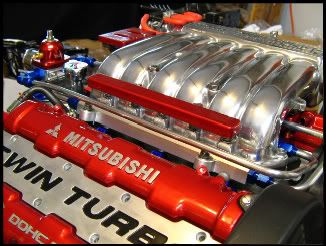
    Here is a great example. Valve Covers!!! I got this one and it was oily and badly stained. I would have spent hours scrubbing this thing down trying to get into all the nooks and grooves.


    Into the tank we go!!


    Yes I am getting the the point I need to drain and refill the tank. It has about a month worth of use now and hundreds of parts. But even as dirty as it is, it still works amazingly!

    Next day I come out and brush to loosen things up and rinse it with the tank hose and Viola!!


    Now that I have the part degreases and de-stained, I'll go drill the sports to remove the oil baffle and clean that area out also. I don't like to drill and handle dirt parts so I clean them all first before any machine work is involved. The stuff left in the area for the gaskets is silicone and that will be wire brushed out.

    Also note my wash tank is not heated. The tank is at room temperature. I drop parts it and when it's full I shut the lid to keep dirt and dust out. next day I scrub them down some and repeat if necessary.

    The simple green does slightly oxidize the aluminum since it is water based. So be sure to not leave a part in there for weeks. All in all it is a great chemical, it is safe, and for the cost, pretty damn cheap! I think I paid about $10 a gallon so roughly $50 to fill my wash tank and was able to clean a couple hundred parts and even though it looks nasty as hell, I can still use it just fine.

    Check it out on Youtube!!


    93 Stealth TT - The Stealth Project

    Renegade Tech Works ECS Controller on Intrax Springs
    Chrome ECU
    Hybrid 13g's
    EVO 560cc Injectors
    Spec Stage 3 clutch
    Ninja Performance Output shaft & Input spool
    Ninja Performance Solid Tensioner & Gates racing T-Belt
    CX Racing Dual Core FMIC
    Megan SS Exhaust
    Fidanza Cam Gears and Clear Covers
    3rd Gen Lifters
    HKS BOV
    K&N FIPK
    Maximal High flow converter
    Walbro FP & FuelLab FPR
    Maximal and Seattle Solid Mounts
    All -6an Lines
    Custom -6AN coolant neck lines
    AWS/ABS/Cruise Delete
    MP Rear Control Arms
    SS Brake Lines
    99 Front Conversion
    2nd gen Rear Bumper
    99 Combat Wing
    Complete interior LED Swap
    Skillard Fuel channel
    Oohnoo FPR Bracket
    .
    .
    More to Come......

  2. #2
    Awesome post. I've been wondering what to use to clean my valve covers before I put them back on, and now I know. Thanks!


    Sent from my iPhone using Tapatalk

  3. #3
    Forum User
    Join Date
    Sep 2010
    Owner Since

    Posts
    503
    Thanks
    11
    Thanked 84 Times in 75 Posts
    A guy that owns a machine shop in Ohio told me about the simple green, it works awesome, and doesn't damage aluminum like the purple power. But for steel parts, purple power is amazing.

    I'm just glad to not see you media blasting. Most of the powder coated valve covers people give me to install get the refusal treatment. Blast media, and coating overspay into the inside of the part are an automatic rejection for me. That's why I clean them with solvent, and paint them. No spun bearings that way.

  4. #4
    Never finishes any verified

    Join Date
    Sep 2010
    Owner Since
    2001

    Location
    Wake Forest, NC
    Posts
    2,518
    Thanks
    51
    Thanked 197 Times in 140 Posts
    Quote Originally Posted by donniekak View Post
    A guy that owns a machine shop in Ohio told me about the simple green, it works awesome, and doesn't damage aluminum like the purple power. But for steel parts, purple power is amazing.

    I'm just glad to not see you media blasting. Most of the powder coated valve covers people give me to install get the refusal treatment. Blast media, and coating overspay into the inside of the part are an automatic rejection for me. That's why I clean them with solvent, and paint them. No spun bearings that way.
    I still run my VC through the blasting cabinet, but I drill out the oil baffles first and remove them. Then once it is all cleaned and either dipped or Powder coated, I seal them back on with silicone and rivets. That way I am sure I get all the sludge out from under the baffles.

  5. #5
    Member Not Verified
    Join Date
    Nov 2010
    Owner Since
    2003

    Posts
    2,062
    Thanks
    112
    Thanked 272 Times in 206 Posts
    Simple green will cause intergranular corrosion of aluminum, but as long as it's washed off with plain water afterwords it's OK. Not like we are dealing with aircraft here. A few helicopter crashes were attributed to simple green, IIRC one was a 47 which killed 12 Marines?

  6. #6
    Forum User Not Verified

    Join Date
    Sep 2010
    Owner Since

    Posts
    331
    Thanks
    0
    Thanked 23 Times in 20 Posts
    Great tip!
    Curious to how you rivet them back on? These the spiral rivets that you hammer on?
    "Life should NOT be a journey to the grave with the intention of arriving in an attractive and well preserved body, but rather to skid in sideways, chocolate in one hand, martini in the other, body thoroughly used up, totally worn out and screaming "WOO HOO what a ride!"

    ----------------[2007 Ride of the Year.................................. 3.5 Stroker I did. w/DBB DR1000's

  7. #7
    Never finishes any verified

    Join Date
    Sep 2010
    Owner Since
    2001

    Location
    Wake Forest, NC
    Posts
    2,518
    Thanks
    51
    Thanked 197 Times in 140 Posts
    I use aluminum pop rivets. Got the idea from I think it was a Honda valve cover I did.

    When I drill out the baffles I drill the hole deep enough for the rivet to sit flush with the baffle on. Got to be really exact on these as if you drill too far you drill through the cover. Drill at an angle as you pop out the side. I build a jig for my drill press to knock them all out easily.

  8. #8
    Forum User
    Join Date
    Sep 2010
    Owner Since

    Posts
    503
    Thanks
    11
    Thanked 84 Times in 75 Posts
    This valve cover had the baffle removed for blasting, and it was riveted back on. One blast of brake clean and I refused to install it.image.jpg

  9. #9
    Never finishes any verified

    Join Date
    Sep 2010
    Owner Since
    2001

    Location
    Wake Forest, NC
    Posts
    2,518
    Thanks
    51
    Thanked 197 Times in 140 Posts
    Quote Originally Posted by donniekak View Post
    This valve cover had the baffle removed for blasting, and it was riveted back on. One blast of brake clean and I refused to install it.image.jpg
    WTFF!! OMG that is horrible!!

    Let me begin all of the points that are wrong:

    1. You don't powder coat the inside, eventually the oil will peel that off from the inside and it will end up in your oil pan, bearings, etc
    2. the powder was not even sprayed on consistently. thick and thin areas all over the place.
    3. Looks to be a cheap epoxy powder not a good grade Polyester TGIC powder.
    4. It was over cured! I can see the burned powder marks.
    5. Wrong silicone used, and applied too heavy. Should only need a small amount and you need to use black or gray for oil resistance. Not red for heat resistance.
    6. Pop Rivets are not installed properly. The head should be flush with the metal, not at an angle. That right one looks to be forced in at a 30 degree angle. It will probably pop out at some point.


    Most of mine are packed up right now but here are some shots of one I have not packed up for NG


    I use aluminum foil and tape to back tape the entire inside of the VC. So powder dust does get int here when removing the foil/tape before baking but it is very minor.
    Also note I peel off the silicone that seeps, it does happen.


    Rivets are flush as they should be so the clamping force of the rivet head is equally applying pressure all around.
    You can also see some of the powder dust that does get in which is minor.


    All holes and ports get silicone caps/plugs to stop the powder form getting in them.
    I also tape off oil cap area so that the cap seals to the metal and not the powder as it could pull the powder off down the road.

    Now this particular valve cover was frustrating to me. This was supposed to be for an order, but after I coated it and went to sand the letting, I noticed the lettering was all rounded down. This is due to someone in the past doing a half ass polish job on the VC and sanding the lettering down to far. Due to that I can't sand the powder off of the lettering as I have no edge to sand to. So it will be sold as is to someone who wants to either hand paint the lettering or try sanding it themselves.

  10. #10
    Forum User
    Join Date
    Sep 2010
    Owner Since

    Posts
    503
    Thanks
    11
    Thanked 84 Times in 75 Posts
    It's good to see someone not half coating the inside. So much bad work out there.

    It's gotten to the point that I've seen so many bad ones I won't install powder coated covers on engines I build. I have personally seen a poorly coated cover score bearings.

    I clean them with solvent, chemically strip the old paint, clean them with brake cleaner and air, then paint them.

Bookmarks

Posting Permissions

  • You may not post new threads
  • You may not post replies
  • You may not post attachments
  • You may not edit your posts
  •  
The 3000GT/Stealth/GTO Web History Project
3000gt.com
3000GT / Stealth International WWWboard Archive
Jim's (RED3KGT) Reststop
3000GT/Stealth/GTO Information and Resources
Team 3S
3000GT / Stealth / GTO Information
daveblack.net
3000GT/Stealth/GTO Clubs and Groups
Michigan 3S
MInnesota 3S
Wisconsin 3S
Iowa, Nebraska, Kansas 3S
North California 3000GT/Stealth
United Society of 3S Owners
3000GT/Stealth/GTO Forums
3000GT/Stealth International
3000GT/Stealth/GTO Event Pages
3S National Gathering
East Coast Gathering
Upper Mid-West Gathering
Blue Ridge Gathering