
Correct, the DNP pipe hits the 3SX pre-turbo pipe.Originally Posted by Forest Gump


Correct, the DNP pipe hits the 3SX pre-turbo pipe.
1988 300ZX Turbo
1994 Dodge Stealth R/T Twin Turbo
1999 Chevy Blazer
2014 Hyundai Veloster Turbo
Looking good!
Project LS3S - '94 Stealth
- Build thread on 3si http://www.3si.org/forum/f1/mdoe8s-n...72/?highlight=
I ordered some connectors from Sheridan Engineering to make a plug and play harness for the 2nd driver's side fan.
I found a $10 terminal crimper at Menards home improvement store that did a nice job for these types of connectors. It's model number PA1176 made by Paladin Tools and Greenlee.
I made some pieces to fill the gap between the bumper cover and the splitter. They are made from rubber garage door bottom seal made by Frost King mounted to 1/8" plastic with some 3/m clear adhesive tape. I used a hollow hole punch to punch out the holes in the rubber seal. I found out about the garage door seal after researching EZ-Lip and finding out that's all it is.
I'm only mounting the bumper cover to the splitter in 6 places, as can be seen in the below picture. I'm using U-nuts in the 4 holes that don't have a mounting bracket behind them.
And the car is finally back together. It's nickname will be "Rudolph" until my bro is ready to paint and I need to finalize the paint scheme.
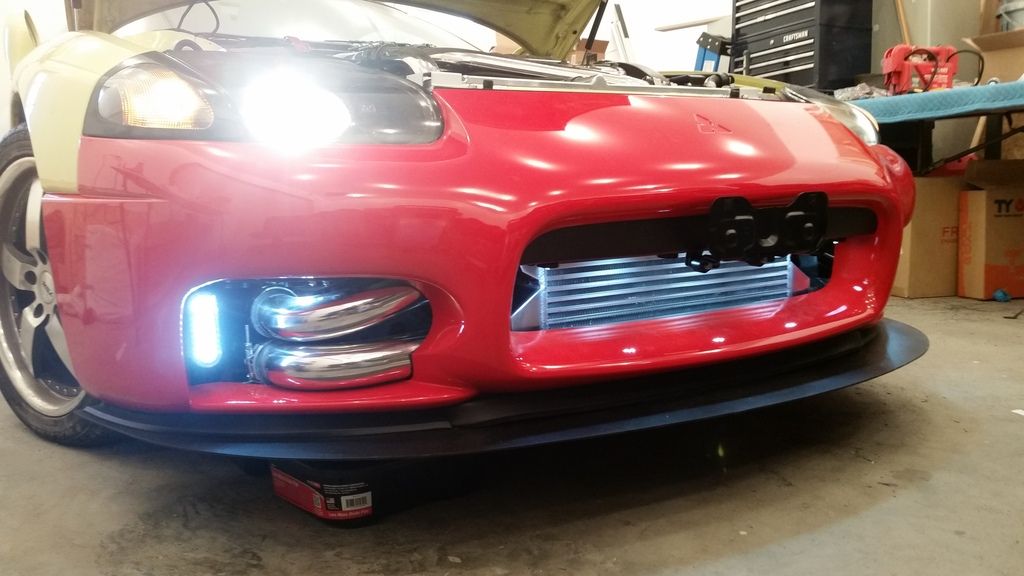

Love the lights lighting up the FMIC.
Me too. I love how much detail you are going into as well.
1995 Dodge Stealth R/T Turbo
Mods: DR750s, BC Sportsman rods, Ross pistons, ACT HD 6 puck clutch, 5 speed transmission, 300M output shaft, Broomfield racing billet transfer case housings, Spectre air filter, GM 3.75" MAF w/translator, DN Pre-turbo pipes, Pampena/CX Racing dual core FMIC, M2 Performance turbo-back exhaust, Walbro 450lph E85 pump, SXPerformance fuel filter, stainless fuel feed lines, EK2 Mfg fuel rails, SXPerformance AFPR, 1000cc Bosch injectors, 99 VR4 replica ECU w/ Chrome for tuning, Kenne Bell Boost-a-Spark, Blitz SBC i-D boost controller, IPS oil cooler, Intrax springs on KYB GR2 struts, Enkei Kojin 18X9.5 +30, Nexen N3000s, 99 front end, carbon fiber steering wheel, Pioneer AVH-X2600BT, JL C2 6.5" and 6"x9" speakers, free 4 channel amp for subs (LOL), twin Alpine 10" type E subs.
Made 608whp/631wtrq on Pampena's dyno @ 31 psi.
Thank you. I know I like the build threads that show not only what was done but HOW it was done so that's what I'm trying to do without being too awful wordy.
Well, after being down and out with pancreatitis for 3 months and taking a hiatus to get back into my radio control car hobby again I have some more updates on the Stealth.
Back before I got sick I picked up one of BlackStealth's LCD boost controllers. The car started idling at around 500rpm about a month ago and would shut off unless I had my foot on the gas pedal. I tracked it down to a bad connection between pins 5 and 6 on the IAC valve but only when the car was warm. I installed a new IAC valve and it idles nicely from a cold start but once it warms up it shoots up to around 2000 rpm so I'm guessing the BISS needs adjusted. Also before I got sick I thought I noticed a sudden drop off in boost while accelerating. That's where the Boost controller comes in. I figure I need to get it installed so it can help diagnose any goofy issues that arise so I started this project last Sunday.
I have spare center air vents already (bought a new one from the dealership even) so I decided to put the LCD Screen in the right side of the air vent. I found that if I put it in the left side then my arm on the steering wheel while driving would block the screen. I cut out a block off plate from a 1/4" thick piece of plastic and hot glued it into the right side air vent duct right behind where the screen mounts to hopefully keep the PC board cleaner and not subjected to as hot/cold of temps from the A/C system. i then made a notch in the side of the air vent for the screen wires to route through. Also, the LCD screen to vent adapter was painted black to cover up the rough 3D printed texture of the plastic.
And the final product.
Since my radio has 2 USB ports on the back for charging or plugging thumb drives into I bought a USB socket extension to route them to the front of the center console. I also bought a dedicated USB charging socket. So next I need to figure out how I want to install the 2 USB sockets, stereo bass boost knob and the rotary knob for the boost controller.
For wheels I think I've decided to go with the American Muscle AMR 18x9s in Dark Stainless finish. They look nice and don't break the bank. I've looked at tons of wheels in the sub $300 range and can't find any that I like the style of any better. I was looking at TSW rotary forged wheels because the TSW's in general seem likely to clear the calipers and are available in offsets and widths for the 3S but I don't see any designs worth ~$1200. But there is some time for me to change my mind yet again.
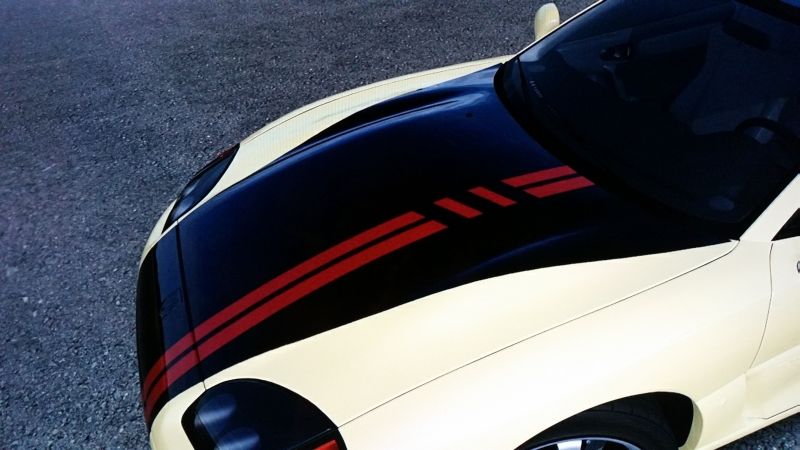
As for the paint scheme, I've done a lot of mockups using the Forza Motorsports 4 video game and I keep coming back to this Viper ACR inspired design:
I added the "tick marks" in the red lines to give it some interest and sort of mimmick how the hood vents on the Viper hood visually break up these lines.
Paint scheme isn't my style, but to each their own. The LCD install came out great!
rise and rise again until lambs become lions
It will not look good with the pearl yellow. I really wanted racing stripes but after a photoshop of it, I just accepted that there isn't anything that will go that well with the pearl yellow.

Both the black *and* red won't look good or just the red? I like the black roof, tinted windows and black headlights so the black onto the hood and rear deck lid doesn't seem too different. Now, the red stripe I could see potentially clashing with a new shiny coat of pearl yellow.
 Posting Permissions
|
3000gt.com 3000GT / Stealth International WWWboard Archive Jim's (RED3KGT) Reststop |
|
Team 3S 3000GT / Stealth / GTO Information daveblack.net |
|
Michigan 3S MInnesota 3S Wisconsin 3S Iowa, Nebraska, Kansas 3S |
North California 3000GT/Stealth United Society of 3S Owners 3000GT/Stealth/GTO Forums 3000GT/Stealth International |
|
3S National Gathering East Coast Gathering Upper Mid-West Gathering Blue Ridge Gathering |

 Reply With Quote


Bookmarks