Page 1 of 5 123 ... LastLast
Results 1 to 10 of 49

Thread: Front Suspension poly bushings

Hybrid View

Previous Post Previous Post   Next Post Next Post
  1. #1
    Forum User verified
    Join Date
    Sep 2010
    Owner Since
    2008

    Location
    St.Louis
    Posts
    501
    Thanks
    22
    Thanked 31 Times in 20 Posts

    Front Suspension poly bushings

    Well at 208k my cars front bushings are getting pretty worn out and I've decided to replace them all with poly. I am still in the process of testing out my findings and will update this thread as needed. Assuming you have dropped the front k member and control arms, that is where I will start explaining how to go about doing this.

    The poly bushings that I sourced from Energy Suspension are:
    Sub-frame bushings: 5.4105
    Sway Bar Bushing: 9.5159
    Control Arm Front location: 9.9482

    The Control arm rear Location is sourced from GZP and is located here: Front Control Arm Bushing (rear location) for 3000GT and Stealth until end Sept. 93 | Ground Zero Performance

    I also replaced my ball joints with Moog Part number K9855

    Now The 4 bushings on the sub-frame can be simply hammered out with large punch shaped object and you should end up with something like this but probably Dirtier:


    Now just grease up your bushings and slide them into their respected places. The ones closer to the front of the car are smaller than the rearward ones.

    The sway bar bushings need to be Bent slightly to fit up against the sub-frame. I borrowed these images from Paul AKA Green-Lantern to show the bend needed.


    You should end up with something like this:


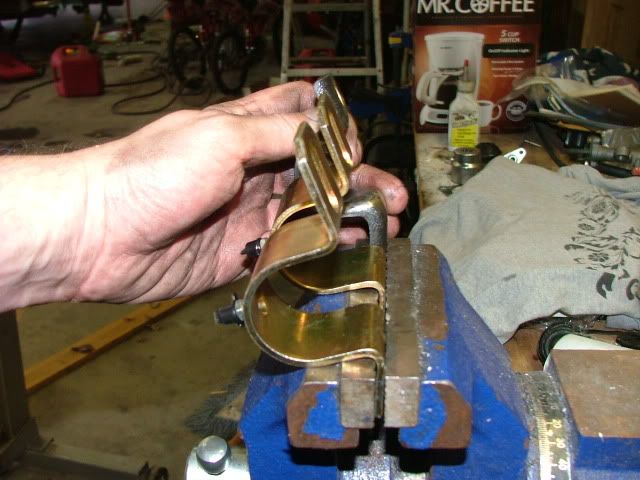
    Now for the Front Control arm bushings, To get them out I sprayed some pb blaster around them on the edges then hit them with a large ball peen hammer to knock them out. It only took a few good blows to knock them out.

    Next, the modifications for the front bushing location. As seen in the following photo a tiny bit of the metal sleeve needs to be ground down or cut off and all but about 3/16" of the outer lip of each of the bushing pieces.


    My sleeves ended up needing to be about 2.1" in length but I would cut them to the length of the spaces in your K-member so they fit properly. The bushings can be pressed in by hand, make sure to grease them amply and then the sleeves can be pressed in with a c-clamp. The final product:


    The bushing sleeve ID is ~.5050 and our bolts are about .469~.470 which to me is too loose. I went to Fasenal and ordered some bolts that are ~.50 so they should fit much better. The K-Member holes are (from front to rear) .4780, .4840, and .5010. The front 2 holes will need to be drilled out but then the bolt should fit quite nicely. I will update this when the bolts come in. I will do the rear location in the next post.


    Ok so the bolts came in from Fasenal today (8/19/13) and I am very happy with how the play in the arm has been tightened up. It is much more solid feeling in my opinion and was worth getting the bolts vs using the stock ones. Drilling out the frame took me about 2 seconds for the bolts to fit through the 2 front holes.


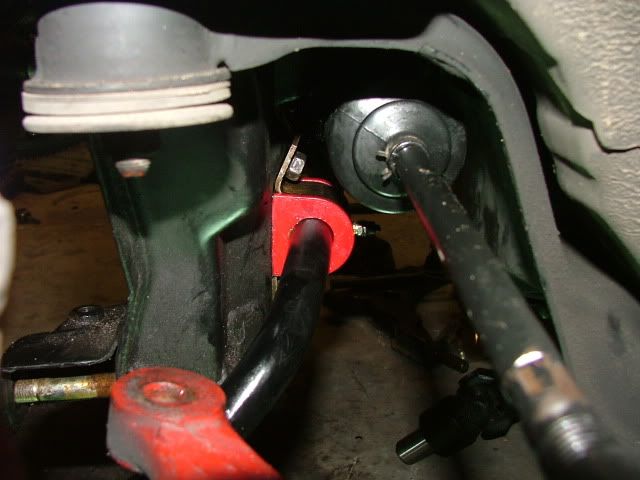
    I forgot to take a pic with the washer and nut installed but you get the idea.
    Last edited by Bloodlust182; 03-31-2014 at 09:51 PM.
    93 Stealth ES - 3000GT conversion,AWD conversion, ACPT 1 piece CFDS, Operable AA wing, 99 rear garnish, R/T sails, ABS delete, SS Clutch line, SS braided brake lines, Vac clutch assist, 2G TT brakes all around, Kyb Gr-2 shocks, Megan Springs up front Tein S tech's in the rear, Cusco rear strut bar, Ebay front strut bar, TT cat back exhaust , K&N cone filter, Poly motor mounts, Poly front suspension bushings, and poly rear diff bushings.

  2. The Following 7 Users Say Thank You to Bloodlust182 For This Useful Post:


  3. #2
    Forum User verified
    Join Date
    Sep 2010
    Owner Since
    2008

    Location
    St.Louis
    Posts
    501
    Thanks
    22
    Thanked 31 Times in 20 Posts
    To prepare the control arm rear location I pressed out the smaller bushings with a C-clamp and a 32mm socket. Then I cut the metal sleeve with a sawzall and punched them out with a punch. Depending on how rusty your brackets are some PB blaster will help get things moving when trying to hammer out the sleeves. Onto the larger bushing which is a bit more tricky. I sharpened a flat-head screw driver on my grinder and drove it around the edge of the bushing with a hammer. Once most of the edge has been punctured I stuck the bushing in a vice and hammered the the rubber/metal center out with my trusty ball peen. There are 2 sleeves that need to be cut out of this bushing unlike the smaller bushings, the thin inner one acts as a cage and the outer one is a support/shell that was used just for ease of pressing. As seen in the following photo


    The rear bushing brackets should look like this when the old rubber bushings are removed:


    Ok got my new poly bushings installed. It took me a while with some sleeves and a vice, but it got the job done!


    You know you digg the awesome pajamas haha.


    I got them all mounted up, but I think there is a problem with the whiteline bushings as I could not get the 3 mounting holes for the bracket to line up. The large bolt that goes through the small poly bushing had no problem mounting, but i had to file out the other 3 holes about 3-4 mm. It seems to me like the front washer on the poly mount that is required moved the mounts too far back. Once everything was bolted up i am quite happy with how tight the suspension feels with me just moving it up and down like it is on the car. As for tightening the nut on the rear mount, it is recommended that you leave it snug then tighten it up when your car is at normal ride height.


    I also have a tidbit of advice for those who are going to swap out the steering rack. When re-installing the rack; trying to line up the splines on the rack and intermediate steering shaft is a nightmare. So to get around fighting with the rack under the car, I
    just disconnected the intermediate steering shaft from the column, attached it to the rack first (leave the rack mounts loose), then reattach the ISS to the column. To disconnect the ISS from the column there are 2 circular shaped holes that you line the bolt up with and use a ratcheting wrench to remove the bolt (12mm) This image should help give you an idea what im talking about.


    If your steering wheel is off center after raising the rack there is an easy way to re-center the steering wheel. You must raise the front tires so there is little resistance while turning and turn from lock to lock. Measure the turns and then position the wheel where you think is center(the wheel may appear off turned but that's what we are going to fix). Remove the airbag off the steering wheel (4 10mm bolts) Then remove the 17mm nut holding the wheel from the steering shaft. Pull the steering wheel off (takes a good tug) and move the clock spring to the "neutral" position (there is a arrow and lettering to tell you it is in the neutral position). Re-position the steering wheel so the wheel looks like it is going straight ahead and put the lock washer and nut back on snug. Now check if there is an even amount of turns from center to lock both ways. If there is then good, your steering wheel is centered to the rack and you can tighten up your 17mm nut and re-install the airbag! If not then repeat until the rack and wheel are centered.


    Conclusion
    Well I just got the car aligned today and I'm pretty impressed with how everything feels, turns feel much more fluid and more controlled. I have heard no squeaking from the poly bushings, and the steering is much less affected by ruts in the roads. The poly bushings do make the ride a little bit harsher over bumps but on smooth roads it is hardly noticeable. If anyone has any questions post them here or PM me.
    Last edited by Bloodlust182; 03-31-2014 at 09:53 PM.

  4. The Following User Says Thank You to Bloodlust182 For This Useful Post:


  5. #3
    1st ever COTM and COTY verified
    Join Date
    Aug 2010
    Owner Since
    Birth

    Location
    Tennessee
    Posts
    7,077
    Thanks
    649
    Thanked 451 Times in 347 Posts
    Quote Originally Posted by Bloodlust182 View Post

    I also have a tidbit of advice for those who are going to swap out the steering rack. When re-installing the rack trying to line up the splines on the rack and intermediate steering shaft is a nightmare. So to get around fighting with the rack under the car, I
    just disconnected the intermediate steering shaft from the column, attached it to the rack first (leave the rack mounts loose), then reattach the ISS to the column. To disconnect the ISS from the column there are 2 circular shaped holes that you line the bolt up with and use a ratcheting wrench to remove the bolt (12mm) This image should help give you an idea what im talking about.


    Will update further when completed with getting it all back together.
    Wish I had this tip before doing my rack.

    Quote Originally Posted by HilbillyHomeboy View Post
    I bet she smells of old mustard and sawdust.
    Jeremy

  6. #4
    I lack color... verified

    Join Date
    Sep 2010
    Owner Since
    Aug 1998

    Posts
    3,589
    Thanks
    104
    Thanked 498 Times in 241 Posts
    Great work Blake! Thank you for the info.

    2014 Exomotive Exocet - #101 "shocker yellow" - 1.8L 5-speed 3.9 torsen FMII powered
    Read more: http://mevowners.proboards.com/threa.../greg-pa-build

    99 Solano Black VR4 - #16 of 287 - ground up restoration - sold
    98 Pearl White VR4 #54 of 231 - 12.84@105mph - 93 Octane 12.50@107mph - 100 Octane with Chromed ECU - sold
    99 Pearl White VR4 #108 of 287 - 3RD place stock car class ECG 11 - Sold
    98 Black VR4: 100% stock - totalled by an Illegal 2-12-08
    95 White Stealth TT - 11.852 @ 118.25 - sold
    95 SSG Stealth TT - 11.981 @ 115.81mph - sold

    "I don't actually work on cars, I just talk about them on the internet."

  7. #5
    Forum User
    Join Date
    Sep 2010
    Owner Since
    2001

    Location
    Avoca, NY
    Posts
    1,135
    Thanks
    7
    Thanked 56 Times in 38 Posts
    Very nice. I might have to put together a kit for this.

  8. #6
    1st ever COTM and COTY verified
    Join Date
    Aug 2010
    Owner Since
    Birth

    Location
    Tennessee
    Posts
    7,077
    Thanks
    649
    Thanked 451 Times in 347 Posts
    Saw this on facebook last night, been keeping my eyes peeled here for you to post this thread

  9. #7
    94 3500gt vr2? verified
    Join Date
    Sep 2010
    Owner Since
    2007

    Location
    NC
    Posts
    1,074
    Blog Entries
    4
    Thanks
    103
    Thanked 29 Times in 17 Posts
    Awesome
    Thanks for posting this

    I'm sure the rest of the BRG'ers appreciate it also
    __________________________________________________


  10. #8
    Forum User verified
    Join Date
    Sep 2010
    Owner Since
    2008

    Location
    St.Louis
    Posts
    501
    Thanks
    22
    Thanked 31 Times in 20 Posts
    I am considering contacting Energy Suspension with a solid model / technical sheets of a correct fitting part so no modification will be needed. As of tonight I have finished the bushing part and need to make the sleeve, then i can make technical drawings and send them to ES. Here is my progress so far:

  11. The Following 2 Users Say Thank You to Bloodlust182 For This Useful Post:


  12. #9
    1st ever COTM and COTY verified
    Join Date
    Aug 2010
    Owner Since
    Birth

    Location
    Tennessee
    Posts
    7,077
    Thanks
    649
    Thanked 451 Times in 347 Posts
    Cool, that would be awesome if they would do it.

  13. #10
    Forum User verified
    Join Date
    Sep 2010
    Owner Since
    2008

    Location
    St.Louis
    Posts
    501
    Thanks
    22
    Thanked 31 Times in 20 Posts
    Sent out an email with pics / technical drawings today. Hopefully they get back to me by tomorrow or Tuesday.

Bookmarks

Posting Permissions

  • You may not post new threads
  • You may not post replies
  • You may not post attachments
  • You may not edit your posts
  •  
The 3000GT/Stealth/GTO Web History Project
3000gt.com
3000GT / Stealth International WWWboard Archive
Jim's (RED3KGT) Reststop
3000GT/Stealth/GTO Information and Resources
Team 3S
3000GT / Stealth / GTO Information
daveblack.net
3000GT/Stealth/GTO Clubs and Groups
Michigan 3S
MInnesota 3S
Wisconsin 3S
Iowa, Nebraska, Kansas 3S
North California 3000GT/Stealth
United Society of 3S Owners
3000GT/Stealth/GTO Forums
3000GT/Stealth International
3000GT/Stealth/GTO Event Pages
3S National Gathering
East Coast Gathering
Upper Mid-West Gathering
Blue Ridge Gathering