Page 1 of 2 12 LastLast
Results 1 to 10 of 18

Thread: ABS Delete

  1. #1
    94 3500gt vr2? verified
    Join Date
    Sep 2010
    Owner Since
    2007

    Location
    NC
    Posts
    1,074
    Blog Entries
    4
    Thanks
    103
    Thanked 29 Times in 17 Posts

    ABS Delete

    So I did my ABS delete this weekend. Was a little harder than I expected, but manageable even with the engine still in the car. I used the STM kit to make this job easier. I had a few things I wasn't sure about and had a hard time finding the answers, so thought I'd make a thread to help people in the future. The OEM ABS delete kit is significantly cheaper, but I probably wouldn't try it with the engine still in the car. $200 for custom kit from STM, $125 for oem kit from ninjaperformance (believe this is the best price you'll find for a kit with new parts). If I had the engine out of the car, I would have most likely gone with the oem kit.

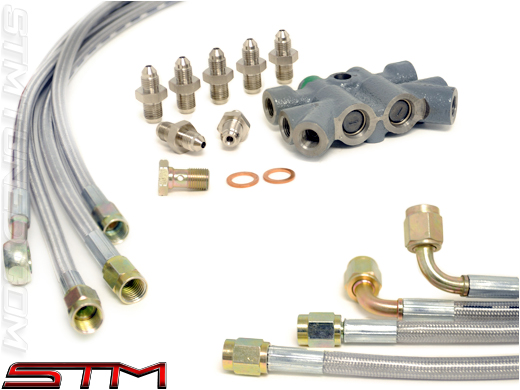
    The STM kit comes with a non-abs prop valve, 4 braided ss lines and some fittings/adapters.
    This kit eliminates all of the mess of hardlines under the hood except for the 2 feeds to the rear.
    It also eliminates the extra segments in the wheel well. Both front calipers will be fed with a line straight from the prop valve to the caliper.

    So far, I like the kit. It's simple and it works. It's not easy to get everything lined up perfectly and there's probably a little room for improvement. At first I didn't like the idea of losing junctions in the wheelwell. For one fitment is tricky and I feel like it needs to be secured better. Also if the end gets damaged at the caliper, you have to replace that whole line all the way to the prop valve. And it just doesn't have a very oem look to it. But simplicity is the real winning factor here, and I think I can live with that

    Tools Needed:
    10, 12mm wrenches
    10, 12mm sockets and ratchet
    4" extension for some of the bolts on firewall
    18" or two 9" extensions for modulator
    10mm flare wrench or crows foot recommended
    Phillips screwdriver
    Pliers
    Something to cut lines with once patience is gone (bolt cutters, lineman pliers)
    10, 11, 12, 13mm wrenches and or flare wrenches (for STM kit)

    Other supplies:
    Lubricant (I prefer acetone/atf mix)
    Insulated wire clips (or reuse old ones)


    New non-abs prop valve
    IMG_20130511_STM_PropValve.jpg

    Forgot to take pics of the lines before installing. Not sure if I'm allowed, but here's a pic from their site.


    Compared to old abs-prop valve
    IMG_20130511_ABS_PropValve.jpg

    Clutter of lines before. You can skip the harness dissection step, lol. That's another ongoing project.
    IMG_20130511_SideWallBefore.jpg
    Last edited by n2nsanity; 05-14-2013 at 12:25 AM.
    __________________________________________________


  2. #2
    94 3500gt vr2? verified
    Join Date
    Sep 2010
    Owner Since
    2007

    Location
    NC
    Posts
    1,074
    Blog Entries
    4
    Thanks
    103
    Thanked 29 Times in 17 Posts
    Removed intake, throttle body and plenum (Optional, but helped me see what I was doing)
    Detached heater hoses and cruise control from firewall to allow plenty of room to work in that area (also optional, but helps).
    Detached fuel filter bracket from firewall. This is necessary because a couple of brake lines run behind it. I routed my new lines behind it.
    Removed all the brackets on the firewall holding the lines down. 5 of them I think. The ones below the brake booster and behind the power steering line are a pain and hard to reach.
    Removed cruise control box and loosened AC lines. There's another bracket behind the AC lines
    IMG_20130511_PartsRemoved_1.jpg

    Before touching any brake lines I sprayed my special mix (atf/acetone) on everything. Lines at Master cylinder, Calipers, Prop valve and Modulator. Be careful not to get on brake pads or rotors. This stuff ensures you won't round any bolts and just makes them SOOO much easier to remove.
    That mix along with a set of these tools made removal easy.
    IMG_20130511_Tool.jpg
    A regular crows foot or 10mm flare wrench would probably work too, but I like my tool better.

    *I guess you could also just cut the lines and yank everything out. I was trying not to break anything by yanking on stuff too much.


    Remove the splashgaurds on the passenger side.

    Unplug the connectors on modulator.
    I think there were three 12mm bolts holding this in. I located and broke them loose to start. At least one of them required me to stack a couple of 9" extensions, lol.


    Plenty of these brackets holding the lines very tightly to the firewall. You almost have to dive headfirst into the bay to reach some of them.
    IMG_20130511_BrakeLineBrackets_1.jpg
    IMG_20130511_BrakeLineBrackets_2.jpg
    Last edited by n2nsanity; 05-14-2013 at 12:10 AM.

  3. #3
    94 3500gt vr2? verified
    Join Date
    Sep 2010
    Owner Since
    2007

    Location
    NC
    Posts
    1,074
    Blog Entries
    4
    Thanks
    103
    Thanked 29 Times in 17 Posts
    I found it easier to install the adapters before mounting the new prop valve to the firewall.

    Then installed 2 shorter lines from Master cylinder to Prop Valve. One with banjo bolt goes on the side of the master cylinder, straight line goes on top. These 2 feeds have 90* fittings on the prop valve ends and I think might have worked better with straight. Banjo bolt was a pain. I kept dropping the washers, lol.

    Be careful with routing. Make sure you're able to secure it to something on the firewall so lines don't rub on anything. Power Steering pulley is pretty close.
    IMG_20130512_RoutingLines_1.jpg

    Installed the lines from prop valve to calipers. These were relatively easy. Only tightened on the prop valve side for now.
    Left port goes straight out to passenger side, Right port goes straight out to driver side.

    Reinstalled the 2 old hard lines for rear into the top ports (same as with the old prop valve)
    Ran these last and routed slightly towards the engine so they sit on top of the braided lines.
    Braided lines don't have that option, so I think this is the only way.
    IMG_20130512_PropValveLinesInstalled.jpg

    Here's how mine is connected. Pic with ports identified
    IMG_20130512_PropValvePorts.jpg

    I don't think anyone would try any other way, but it's important that you connect the front wheels to the port facing them.
    This allows the distributed braking pressure in case one of the lines fail. Front Right and Rear Left are on half the valve. Right Front and Rear Right are on the other half.
    Last edited by n2nsanity; 05-14-2013 at 12:30 AM.

  4. #4
    94 3500gt vr2? verified
    Join Date
    Sep 2010
    Owner Since
    2007

    Location
    NC
    Posts
    1,074
    Blog Entries
    4
    Thanks
    103
    Thanked 29 Times in 17 Posts
    Finishing writeup tomorrow...
    Last edited by n2nsanity; 05-13-2013 at 12:50 AM.

  5. #5
    94 3500gt vr2? verified
    Join Date
    Sep 2010
    Owner Since
    2007

    Location
    NC
    Posts
    1,074
    Blog Entries
    4
    Thanks
    103
    Thanked 29 Times in 17 Posts
    Old lines removed.
    IMG_20130512_OldBrakeLinesRemoved.jpg

    Got this from another member. Though it was pretty funny.


    Still need to upload more completed pics, but I'm in the middle of several projects right now.

    Questions? I'll answer them here.

    Q.) How do you like it compared to before with abs? I mean as far as driving experience goes.
    Q.) Also curious as to the feel of the brake pedal, and stopping ability
    A.) Will update when I get car back together.

    Q.) How much does what you pulled out weigh?
    A.) About 20 lbs. Will try to get an exact weight later.


    If my instructions suck, there's also a really good video out there.
    Last edited by n2nsanity; 06-02-2013 at 11:51 PM.

  6. #6
    Forum User
    Join Date
    Oct 2011
    Owner Since
    2007

    Location
    Sundsvall, Sweden
    Posts
    928
    Thanks
    330
    Thanked 119 Times in 77 Posts
    Nice writeup!

  7. #7
    94 3500gt vr2? verified
    Join Date
    Sep 2010
    Owner Since
    2007

    Location
    NC
    Posts
    1,074
    Blog Entries
    4
    Thanks
    103
    Thanked 29 Times in 17 Posts
    Thanks
    Needs a little tweaking. I'm trying to keep it simple and still answer any possible questions.

  8. #8
    Forum User
    Join Date
    Jun 2011
    Owner Since
    2010

    Location
    Sweden, Gothenburg
    Posts
    835
    Thanks
    32
    Thanked 49 Times in 38 Posts
    how do you like it compared to before with abs?

    I mean as far as driving experience goes.

  9. #9
    Banned J. Fast's Avatar
    Join Date
    Sep 2010
    Owner Since
    - O - SIX -

    Location
    Colorado, USA
    Posts
    2,711
    Thanks
    405
    Thanked 200 Times in 140 Posts
    How much does what you pulled out weigh?

  10. The Following User Says Thank You to J. Fast For This Useful Post:


  11. #10
    VR-3747 :D Not Verified
    Join Date
    Sep 2010
    Owner Since
    2008

    Location
    Dayton Ohio
    Posts
    1,792
    Blog Entries
    1
    Thanks
    19
    Thanked 123 Times in 86 Posts
    also curious as to the feel of the brake pedal, and stopping ability
    rise and rise again until lambs become lions

Bookmarks

Posting Permissions

  • You may not post new threads
  • You may not post replies
  • You may not post attachments
  • You may not edit your posts
  •  
The 3000GT/Stealth/GTO Web History Project
3000gt.com
3000GT / Stealth International WWWboard Archive
Jim's (RED3KGT) Reststop
3000GT/Stealth/GTO Information and Resources
Team 3S
3000GT / Stealth / GTO Information
daveblack.net
3000GT/Stealth/GTO Clubs and Groups
Michigan 3S
MInnesota 3S
Wisconsin 3S
Iowa, Nebraska, Kansas 3S
North California 3000GT/Stealth
United Society of 3S Owners
3000GT/Stealth/GTO Forums
3000GT/Stealth International
3000GT/Stealth/GTO Event Pages
3S National Gathering
East Coast Gathering
Upper Mid-West Gathering
Blue Ridge Gathering