Page 1 of 2 12 LastLast
Results 1 to 10 of 15

Thread: Clutch adjustment = no need for trans rebuild!

  1. #1
    No BS
    Join Date
    Sep 2010
    Owner Since
    Sorry if you care, I could be lying anyway!

    Location
    NJ (south)
    Posts
    221
    Thanks
    8
    Thanked 8 Times in 4 Posts

    Clutch adjustment = no need for trans rebuild!

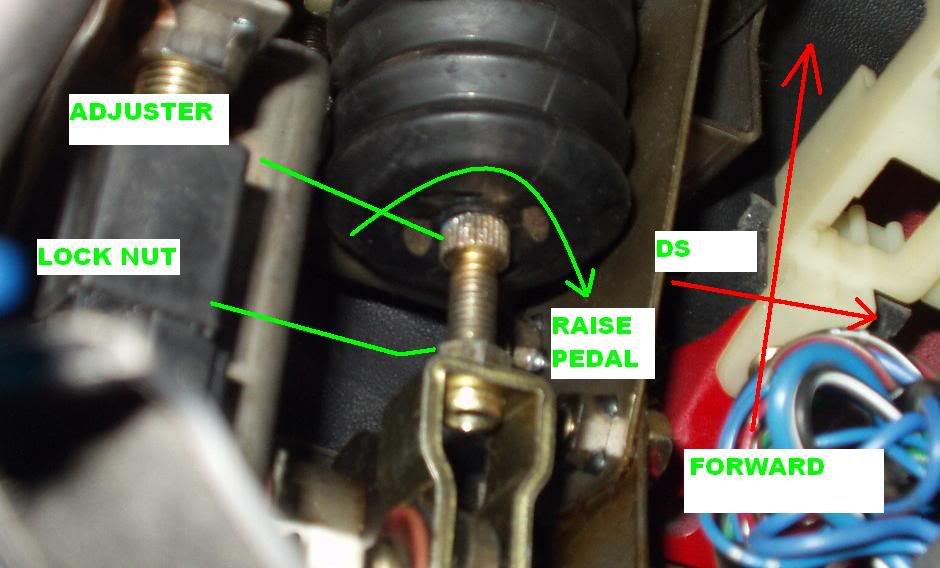
    I was grinding 2nd and shifting was way too notchy and I started getting blocked out of gears and grinding all gears and really having to fight to shift under all circumstances... then I adjusted my clutch to engage farther from the floor, and it fixed everything, and it shifts like new now! SO happy it does not need a trans rebuild!!!
    Dave


    91 Stealth TT- Pampena Stage 2 short block, rebuilt heads, Solid mounts, MBC, Vac reduc, hotwired, Blitz FATT, 4.5" FIPK, TurboXS BOV, Stainless Downpipe, Race pipe, Borla exhaust, AHDS, 500 lb clutch, JDM 25 spline 5 spd/tcase, Short Shifter, EVO leather knob, 18" Mazdaspeed wheels, Front Splitter, in dash touch screen bluetooth/navigation/DVD...

    94 3000GT DOHC - Nitrous express proton series w/ upgraded solenoids, dash mounted datalogger, in dash touch screen navi w/bluetooth, IPT end clutch, high performance trans cooler, Translab shift kit. SOLD

  2. #2
    VR-3747 :D Not Verified
    Join Date
    Sep 2010
    Owner Since
    2008

    Location
    Dayton Ohio
    Posts
    1,792
    Blog Entries
    1
    Thanks
    19
    Thanked 123 Times in 86 Posts
    wierd. was it not disengaging all the way? was it engaging like a cm off the floor or something?
    rise and rise again until lambs become lions

  3. #3
    No BS
    Join Date
    Sep 2010
    Owner Since
    Sorry if you care, I could be lying anyway!

    Location
    NJ (south)
    Posts
    221
    Thanks
    8
    Thanked 8 Times in 4 Posts
    Yes, I had to pin the pedal to the floor to shift, and it would start to engage as soon as my foot started to lift. That's why I had to adjust it, I knew it was not supposed to engage so low. After adjusting it to where the engage point felt right around the 1st 20% of the uptravel, and she shifts like butter now... Sigh, the small victories are nice...

  4. #4
    Member verified
    Join Date
    Sep 2010
    Owner Since
    Aug 15, 2005

    Location
    Texas
    Posts
    687
    Thanks
    15
    Thanked 45 Times in 28 Posts
    Any references for anyone that needs to do this?

  5. #5
    No BS
    Join Date
    Sep 2010
    Owner Since
    Sorry if you care, I could be lying anyway!

    Location
    NJ (south)
    Posts
    221
    Thanks
    8
    Thanked 8 Times in 4 Posts
    http://www.3si.org/forum/f12/clutch-adjustment-310609/

    Sorry to use a thread from another forum, but at least now we have the info here too... LOL

  6. #6
    XLR8TOR
    Join Date
    Sep 2010
    Owner Since

    Location
    Las Vegas, NV
    Posts
    166
    Thanks
    0
    Thanked 7 Times in 7 Posts
    Attention 3S Owners: Read this first before you attempt ANY clutch adjustments.

    This is a direct link to an article at the Stealth316 site.

    http://stealth316.com/2-clutch-bracket-bolt.htm

    This link details a problem I ran into several years ago and everyone should be aware of the problem.

  7. #7
    Member verified
    Join Date
    Sep 2010
    Owner Since
    Aug 15, 2005

    Location
    Texas
    Posts
    687
    Thanks
    15
    Thanked 45 Times in 28 Posts
    I will take some pics and throw it in here when I do mine today or tomorrow.

  8. #8
    No BS
    Join Date
    Sep 2010
    Owner Since
    Sorry if you care, I could be lying anyway!

    Location
    NJ (south)
    Posts
    221
    Thanks
    8
    Thanked 8 Times in 4 Posts
    This is from the thread I referenced earlier... I don't know the creator of the image, but it was perfect for helping me adjust mine properly...

    What you see is looking at the clutch pedal linkage under the dash next to the clutch pedal, and it is upside down as if you are laying on your back...

    Loosen the lock nut and turn the shaft at the grooves using a needle nose pliers then tighten the lock nut again... turning clockwise raises the engage point...

    Last edited by hotGTO; 09-29-2010 at 12:06 PM.

  9. #9
    Member verified
    Join Date
    Sep 2010
    Owner Since
    Aug 15, 2005

    Location
    Texas
    Posts
    687
    Thanks
    15
    Thanked 45 Times in 28 Posts
    Yeah, sorry, I still haven't got into a position to even check my clutch engagement yet.

  10. #10
    No BS
    Join Date
    Sep 2010
    Owner Since
    Sorry if you care, I could be lying anyway!

    Location
    NJ (south)
    Posts
    221
    Thanks
    8
    Thanked 8 Times in 4 Posts
    Quote Originally Posted by blindmist View Post
    Yeah, sorry, I still haven't got into a position to even check my clutch engagement yet.
    LOL, I revisited this and realized I had not told anyone how to do it for themselves, so I hope it's a better thread now... Thanks for the nudge!

Tags for this Thread

Bookmarks

Posting Permissions

  • You may not post new threads
  • You may not post replies
  • You may not post attachments
  • You may not edit your posts
  •  
The 3000GT/Stealth/GTO Web History Project
3000gt.com
3000GT / Stealth International WWWboard Archive
Jim's (RED3KGT) Reststop
3000GT/Stealth/GTO Information and Resources
Team 3S
3000GT / Stealth / GTO Information
daveblack.net
3000GT/Stealth/GTO Clubs and Groups
Michigan 3S
MInnesota 3S
Wisconsin 3S
Iowa, Nebraska, Kansas 3S
North California 3000GT/Stealth
United Society of 3S Owners
3000GT/Stealth/GTO Forums
3000GT/Stealth International
3000GT/Stealth/GTO Event Pages
3S National Gathering
East Coast Gathering
Upper Mid-West Gathering
Blue Ridge Gathering