 View Profile
 View Forum Posts
 View Forum Threads
 Show All Albums
 Private Message
 View Articles
 View Blog Entries

I think you will be surprised how fast the mechanical part goes. Its all actually quite easy. The long part ( for me at least) is all the cleaning, painting and polishing. And judging from your car, you will be way more anal about that than I am.


I think you will be surprised how fast the mechanical part goes. Its all actually quite easy. The long part ( for me at least) is all the cleaning, painting and polishing. And judging from your car, you will be way more anal about that than I am.

Thanks Corey. I make progress and then I get stuck on an exhaust nut or axle nut for a while. Right now it's popping the axles out that's giving me trouble. I think it will go much faster after I get the engine pulled.
The rebuild will probably be a lot slower since I have to get more tools and look up all the torque specs.
Cleaning painting and polishing will take time too but I've done so much already that it won't be too bad.
That will take time, but by doing that and rellacing those old rusted nuts and bolts here and there, you will be so happy you took the extra time when all is said and done. Your engine will be awesome!Originally Posted by Jimvr4

-John
I need one of those plastic kiddie pools for that. LOL
Jim I'm glad to know I'm not the only one that can spend hours getting just a few nuts and bolts loose.
I broke one on the front turbo last week.
That's going to be a bear to get out.
Sounds like you are moving right along!
Good job sir...now quit posting (without pics) and go get greasy
if you cant fix it with a hammer...then you have an electrical problem
Karen, Thanks. I'm following your thread too. I like knowing I'm not the only one and there's plenty of help out there when needed. I was like "F YES" when I got that last exhaust nut loose on the DP. I'm scared to death to break bolts. The impact driver has made a huge difference but exhaust bolts are something else. I've never had to heat stuff before but I had a propane torch sitting on the floor aimed at the Cat exhaust bolt for like 5 minutes while I pounded away on a box end wrench and finally broke it loose.
I took some pics the other day but haven't had time to upload them. Will try to get to the axle shafts tonight after dinner.
Subscribed. Always interested in "failure" modes on these cars, AND, will be doing similar work in the future...hopefully on my own terms with 120k and all.
It would seem you can always pull the pan and the oil filter to see what remnants are there; although much easier to deal with pan when engine pulled. Were you datalogging at all? Good luck with build.
Time for an update with pictures.
Story
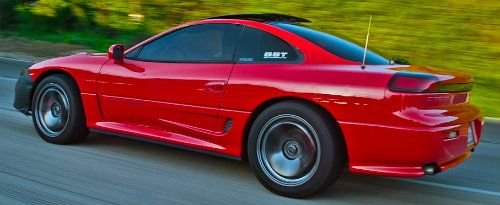
I went to a car meet at a private airfield with the EuroSunday group which is mostly performance BMWs but also included Ferrari, Lotus and other high performance cars. The object of the day was to go fast and get pictures of the car. Here she is sitting on the tarmac in her last picture before the disaster:
I think I hit 120 on the first run and saw the flagmen at the braking zone marker and all was well. On the second run of the day nobody was at the braking zone and I was looking at the speedometer to check my speed when I missed the braking zone. I realized I did not have enough room left to brake so I hit the brakes and kept straight and ran off the runway into gravel. I continued to hold the brakes however the car wasn't losing speed rapidly enough and I ended up doing a power slide with the driver side expose to the gravel. Well we won't talk about thatAnyway here she sits:
Here are a few things I won't be needing any time soon:
That's my son's bed haha. He's in Boston indefintitely so his bed makes a good hood pillow. I hate making mistakes becouse of doing things wrong the first time. I tried to separate the driver's side half shaft at the junction of the green thing and managed to create almost a 1/8 gap before I realize I was doing it the hard way.
I managed to borrow a 2 ton engine hoist engine hoist with a load leveling bar. Nice!
The failure mode is that the engine will not spin freely - it encounters resistance on part of the cycle. Maybe a spun bearing is creating the resistance. We will know soon. Anyway, I suspected the starter first as it could not turn the motor the 200-300 rpm needed to build compression in the cylinders. I took the starter apart and cleaned out a ton of carbon dust buildup. I also took a thin screwdriver and cleaned out the grooves of the commutator and then lightly sanded it to a shine with 300 grit sandpaper. Put it all back together and no change in the performance. So the starter was not the problem. Brushes still had lots of wear left so this starter should last a long time from here:
That last pic shows my little trick to hold the brush springs with small nails so I can easily reassemble the brush carrier to the commutator.
Struggled with the rear roll pin. I ended up pulling the rear turbo heat shield and used the engine hoist to take the load off the pin. In this pic you can see my 1 1/4 galvanized pipe over the handle of the ratchet. This worked well to hold the nut while I cranked on the bolt from the passenger side with my breaker bar.
Here she sits now ready to pull the engine. I pulled the bumper because I think the hoist will draw itself to the car when I raise it to the lift over point. I will have to do the pull with the garage door closed, then manuever the hoist so I can lower the engine down to clear the garage door open rail. Then I'll separate the transmission. I already broke the trans bolts loose while it's still in the car.
I got the 750 lb engine stand from Harbor Freight. Had to get out my grinder and touch up one of the slots so that the pivot arm could rotate freely. I also greased all the wheels.

|
3000gt.com 3000GT / Stealth International WWWboard Archive Jim's (RED3KGT) Reststop |
|
Team 3S 3000GT / Stealth / GTO Information daveblack.net |
|
Michigan 3S MInnesota 3S Wisconsin 3S Iowa, Nebraska, Kansas 3S |
North California 3000GT/Stealth United Society of 3S Owners 3000GT/Stealth/GTO Forums 3000GT/Stealth International |
|
3S National Gathering East Coast Gathering Upper Mid-West Gathering Blue Ridge Gathering |


 Reply With Quote
 Visit Homepage




Bookmarks