Page 1 of 2 12 LastLast
Results 1 to 10 of 11

Thread: Setting the timing

  1. #1
    Forum User verified
    Join Date
    Sep 2010
    Owner Since

    Location
    athens, ga
    Posts
    82
    Thanks
    3
    Thanked 2 Times in 2 Posts

    Setting the timing

    Hey guys i should know everything about setting the timing on this car, but its been a little while since ive done it and i have a few questions just to make sure im doing it right. The rear cam gears, when aligned with there timing marks should they be loose and not under any pressure? My fronts are of course under alot of pressure, just cant remember how the rears are suppose to be.
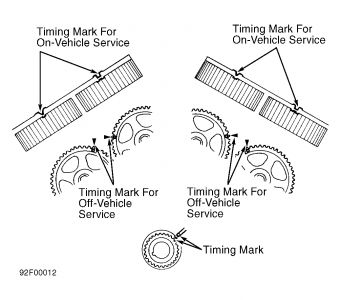
    Next question is on the cam gears there are two different sets of marks to align the cam gears with. One from the top of the engine and one from the side, well i align the top marks and the side marks are off by about half a tooth. Is this normal? Thanks guys


    Mods: Evo3 16G turbo's, Titan manifolds, 680cc Denso's, ARC2 w/ large MAS, FMIC, TiAL BOV, DR Stage III heads, AC Delete, Flex-A-Lite fans, 25 row oil cooler,

  2. #2
    1st ever COTM and COTY verified
    Join Date
    Aug 2010
    Owner Since
    Birth

    Location
    Tennessee
    Posts
    7,077
    Thanks
    649
    Thanked 451 Times in 347 Posts
    You might not be looking at the right marks. They should all line up. These marks should line up with the round marks on the side of the cam gears.


    You really need a book. You only get one chance at this. If you don't get it right you will be replacing valves.

    Quote Originally Posted by HilbillyHomeboy View Post
    I bet she smells of old mustard and sawdust.
    Jeremy

  3. #3
    1993 rt/tt Not Verified
    Join Date
    Sep 2010
    Owner Since
    2005

    Location
    wa state
    Posts
    813
    Thanks
    82
    Thanked 181 Times in 119 Posts
    ^^^what he said, and get the tensioner tool or you could also be replacing valves then too

  4. #4
    Forum User verified
    Join Date
    Sep 2010
    Owner Since

    Location
    athens, ga
    Posts
    82
    Thanks
    3
    Thanked 2 Times in 2 Posts
    O i have the tensioner tool and a manual. About the timing marks your showing, yes i know they are suppose to line up with those but there are also timing marks on the top part of the valve covers as well. The manual says that you use the top when the engine is in the car and the side shot when the engine is out of the car. But i thought they should both line up.

  5. #5
    Forum User verified
    Join Date
    Sep 2010
    Owner Since

    Location
    athens, ga
    Posts
    82
    Thanks
    3
    Thanked 2 Times in 2 Posts
    Heres a pic that shows the upper marks


  6. #6
    SKADOOSH!!! verified
    Join Date
    Sep 2010
    Owner Since
    2008

    Location
    Prince George
    Posts
    1,295
    Blog Entries
    4
    Thanks
    46
    Thanked 49 Times in 42 Posts
    Just go by the small arrows on the valve cover. The front cams will be very tight and under a lot of pressure, however the rear cam gears should be around 75% tension of the front. The rear cam gears should also be sitting on the marks without trying to spring away. Best way to go about it is to start at the timing cog on the crank and work your way toward the back cams and over the engine, that way you don't have to wory about setting the crank back 1or two teeth. just make sure the belt remains tight all the way through the process, and do your thing tightening when you get past the front cams, make sure you use your tensioner tool as well. Rebuilding heads sucks...
    Photobucket

  7. #7
    Padawan garage troll Not Verified
    Join Date
    Sep 2010
    Owner Since
    2004

    Location
    Newark, DE
    Posts
    635
    Blog Entries
    5
    Thanks
    68
    Thanked 23 Times in 21 Posts
    Quote Originally Posted by green-lantern View Post
    You might not be looking at the right marks. They should all line up. These marks should line up with the round marks on the side of the cam gears.


    They should all line up, I had to convince myself of some of this, because some are hard to see, straight on, if the engine is in the car.

  8. #8
    Forum User verified
    Join Date
    Sep 2010
    Owner Since

    Location
    Loveland, OH
    Posts
    143
    Blog Entries
    1
    Thanks
    5
    Thanked 13 Times in 7 Posts
    I put my belt on with the lash adjusters out and life was grand. I recommend popping them out and doing it that way.. It just makes life a whole lot easier when you're not fighting with the spring tension..

  9. #9
    Forum User verified
    Join Date
    Sep 2010
    Owner Since

    Posts
    449
    Thanks
    48
    Thanked 26 Times in 17 Posts
    Quote Originally Posted by Roybatty View Post


    They should all line up, I had to convince myself of some of this, because some are hard to see, straight on, if the engine is in the car.
    i use a small mechanics mirror so that i dont have to look at the marks at an odd angle.

    the only 'tip' that i dont think has been mentioned here yet is to do the front gears first, then go around the water pump and over the back gears. i like to allow the back gears to rotate a TINY bit counter clockwise (not even a full tooth) so that the belt slips on them easily. than make sure (like in the manual) your crankshaft sprocket is one tooth off on the counterclockwise direction. after you put the belt around the crank's sprocket you rotate the crank a tiny bit clockwise. the timing mark on the crank should now be dead on and the belt will be nice and tight from the crank to the rear cam gears and from the rear cam gears to the water pump. the whole purpose to doing this is to get the belt nice and tight in between the front and rear cyl banks.

    i know i didnt explain that too well but its in the manual. just wanted to remind you not to skip that step. the first time my dad tried to do the timing on his stealth he was confused by the book and ignored that step so i had to redue the timing for him lol.
    the basic go fast bits...
    forged short block, Billet DR1000's, 680cc injectors, meth inj, FMIC, MAFT, Apexi Neo, hotwired 255lph fuel pump.

    Tuned by Ray Pampena

    Just a fun Daily Driver.

  10. #10
    Diamonds and Rust
    Join Date
    Sep 2010
    Owner Since
    1-11-01

    Location
    ak
    Posts
    186
    Thanks
    0
    Thanked 6 Times in 5 Posts
    Quote Originally Posted by MightyMouse View Post
    I put my belt on with the lash adjusters out and life was grand. I recommend popping them out and doing it that way.. It just makes life a whole lot easier when you're not fighting with the spring tension..
    im to lazy to pull the plenum and valve cover and lifters to do a timing belt,lol. heres a few tips not mentioned yet.
    to set the cams up for putting on your timing belt its best to set the crank sprocket 4 teeth counter clockwise so if the cams get away from you there no way for them to hit your pistons(thanks jackhammer!). you will reline up the crank after setting cams. the front 2 cam you will want to rotate toward each other to line them up(insert lockers if you use them) and, the same with the rear but the rear exhaust wont have barely any spring pressure on it.

Bookmarks

Posting Permissions

  • You may not post new threads
  • You may not post replies
  • You may not post attachments
  • You may not edit your posts
  •  
The 3000GT/Stealth/GTO Web History Project
3000gt.com
3000GT / Stealth International WWWboard Archive
Jim's (RED3KGT) Reststop
3000GT/Stealth/GTO Information and Resources
Team 3S
3000GT / Stealth / GTO Information
daveblack.net
3000GT/Stealth/GTO Clubs and Groups
Michigan 3S
MInnesota 3S
Wisconsin 3S
Iowa, Nebraska, Kansas 3S
North California 3000GT/Stealth
United Society of 3S Owners
3000GT/Stealth/GTO Forums
3000GT/Stealth International
3000GT/Stealth/GTO Event Pages
3S National Gathering
East Coast Gathering
Upper Mid-West Gathering
Blue Ridge Gathering