Page 1 of 7 123 ... LastLast
Results 1 to 10 of 66

Thread: Stealth Trailer Build

  1. #1
    Never finishes any verified

    Join Date
    Sep 2010
    Owner Since
    2001

    Location
    Wake Forest, NC
    Posts
    2,518
    Thanks
    51
    Thanked 197 Times in 140 Posts

    Stealth Trailer Build

    So a couple of you that are friends with me on Facebook have seen some pics of the progress of the trailer build I have been working on for the last couple of months. The progress has been slow due to work, the weather, planning my wedding, tracking down materials and of course money. So I guess I am at the point to actually start a thread on the whole build process up until now.

    Many of you know that Hans at GZP was the first one to build one of these trailers. I loved the idea so much that I decided to tackle building one myself. All credit goes to Hans for initially tackling this and his original trailer helped me get through a bunch of hurdles I had when designing mine. If you are interested in getting a trailer for yourself, Hans at GZP does build these for anyone interested: http://www.3swarehouse.com/index.php...emart&Itemid=1

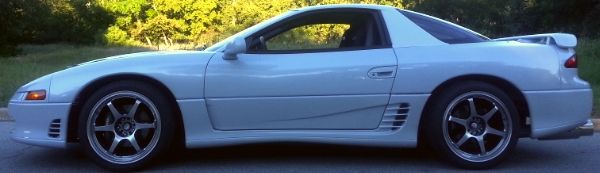
    After building my Stealth TT I had pretty much an empty N/A frame at the house that made a good start for the build. This was the first Stealth I ever bought "10 years ago" and due to sentimental reason I couldn't send it off to the crusher.


    Interior was gutted and installed in the TT


    Phase one:

    Break out the saw and cut the car in half as I am only using the rear end. Left enough of the lower frame so I could tie in the trailer tongue to the original Stealth frame.


    I was really surprised how light the rear end was! I could wheel it around without much force. This is due to the positioning of the rear wheels as the fulcrum point.

    The front end on the other hand was a nightmare to move around! I ended up filling the front end with all of the scrap parts I had that where junk and sent it off to the crusher. I ended up making some decent money off of the front clip which all went to buying steel for the trailer!


    I cut out the floor of the trailer and framed it in using angle iron. tying in to the original frame of the car on the sides and rear. The doors were also cut and welded onto the trailer at this point. All internals of the doors were removed to save weight.


    After all of the lower frame rails were done I started to work on framing in the front and adding in support frame rails. The upper most supports were just a test and I have come up with a different idea for those.


    The longest wait was trying to get the steel I needed for the main center support beam for the tongue. Most of the steel I was able to track down locally but this particular piece I had to order offline. The main center bean was 2 3/4 X 2 /34 X 1/4 steel square tube. I needed something strong as I was doing a combination tongue where as Hans did an A-Frame tongue. The center beam runs about 12" under the Stealth drive shaft tunnel as is tied in to both the stock section of the car and the newly created frame. I used grade 8 bolts to bolt the beam to the Stealth rear Section along with welding it to make sure nothing broke free. Using 1/4 angle I tied the center beam and angled them back to the frame for horizontal support when turning, etc. when the center beam was attached I actually had the hitch holding it to the TT while I welded everything up. This helped me position the height and keep the trailer level with the car.


    Currently with the trailer attached to the car it only dropped the rear end my 1/4 "Intrax Springs" I can jump up and down on the trailer tongue and the rear end does not bottom out and the exhaust does not hit the ground. With the wheels being so far back it should be able to balance a decent load without issues. Right now I am guessing the tongue load is about 90lbs "Best Guess". I need to actually get a weight on it to see how much more I can add without being concerned of exceeding the tongue weight.

    Check it out on Youtube!!


    93 Stealth TT - The Stealth Project

    Renegade Tech Works ECS Controller on Intrax Springs
    Chrome ECU
    Hybrid 13g's
    EVO 560cc Injectors
    Spec Stage 3 clutch
    Ninja Performance Output shaft & Input spool
    Ninja Performance Solid Tensioner & Gates racing T-Belt
    CX Racing Dual Core FMIC
    Megan SS Exhaust
    Fidanza Cam Gears and Clear Covers
    3rd Gen Lifters
    HKS BOV
    K&N FIPK
    Maximal High flow converter
    Walbro FP & FuelLab FPR
    Maximal and Seattle Solid Mounts
    All -6an Lines
    Custom -6AN coolant neck lines
    AWS/ABS/Cruise Delete
    MP Rear Control Arms
    SS Brake Lines
    99 Front Conversion
    2nd gen Rear Bumper
    99 Combat Wing
    Complete interior LED Swap
    Skillard Fuel channel
    Oohnoo FPR Bracket
    .
    .
    More to Come......

  2. #2
    Forum User
    Join Date
    Sep 2010
    Owner Since
    2002

    Posts
    1,668
    Thanks
    514
    Thanked 388 Times in 259 Posts
    Are you planning to close the trailer and make it look finished?
    '93 VR4 | 10.57 @ 135 on C16 | 11.29 @ 125 on 93 | ~3275 lbs

  3. #3
    Forum User
    Join Date
    Sep 2010
    Owner Since
    1998

    Location
    Easton, Pennsylvania, United States
    Posts
    2,042
    Thanks
    54
    Thanked 135 Times in 105 Posts
    I can't wait to see how this turns out. It's good to see how someone else would do it.

  4. #4
    Never finishes any verified

    Join Date
    Sep 2010
    Owner Since
    2001

    Location
    Wake Forest, NC
    Posts
    2,518
    Thanks
    51
    Thanked 197 Times in 140 Posts
    Spent almost a month trying to track down sheet metal and finally found some. I was wanting to go with 18 gauge but had to settle on 20 gauge sheet metal as it was all that was available. I will just need to add in a couple more supports to stop the sheet metal from flexing but nothing major. The fun part was cutting the sheet metal to contour the shape of the doors and them actually welding them on. My welder works great on thick steel but is burning through the sheet metal is I try to lay a full bead. So I had to pretty much spot weld everything together. Which is holding just fine. The sheet metal is not for support but just the enclosure. I will be using Seam sealer on the inside to make everything water proof. Fiber resin will fill in the outside gaps along with body putty.


    Wiring has also been completed. I ended up running a standard 4 prong trailer plug with an extra 10 gauge wire that I will use to power some other additional accessories later on down the road.

    Right now I am spending my time getting the rest of the upper frame and sheet metal done which will take some time. I want to fashion a door on the upper part so I can access that part of the trailer without having to crawl through the hatch. I am working on a design to make sure the door is water tight and that I am able to tie in the side sheet metal without issues.

  5. #5
    Never finishes any verified

    Join Date
    Sep 2010
    Owner Since
    2001

    Location
    Wake Forest, NC
    Posts
    2,518
    Thanks
    51
    Thanked 197 Times in 140 Posts
    Quote Originally Posted by AdamVR4 View Post
    Are you planning to close the trailer and make it look finished?
    Damn picture limit stopped me from adding them all into the first thread....LOL. I couldn't get the second part of the thread up fast enough!!

    Quote Originally Posted by Hans@GZP View Post
    I can't wait to see how this turns out. It's good to see how someone else would do it.
    Thanks Hans!

  6. #6
    Forum User verified
    Join Date
    Sep 2010
    Owner Since
    November 1999

    Location
    Rowlett
    Posts
    1,275
    Thanks
    455
    Thanked 93 Times in 64 Posts
    Great work so far.

    -John

  7. #7
    1st ever COTM and COTY verified
    Join Date
    Aug 2010
    Owner Since
    Birth

    Location
    Tennessee
    Posts
    7,077
    Thanks
    649
    Thanked 451 Times in 347 Posts
    Keep it up man

    Quote Originally Posted by HilbillyHomeboy View Post
    I bet she smells of old mustard and sawdust.
    Jeremy

  8. #8
    Here for the party Not Verified
    Join Date
    Sep 2010
    Owner Since
    2006

    Location
    Canaan NH
    Posts
    1,710
    Thanks
    364
    Thanked 106 Times in 87 Posts
    Kick ass, cant wait to see it done!!!

  9. #9
    1994 3000GT Original Owner. verified
    Join Date
    Sep 2010
    Owner Since
    August 1994

    Location
    Bel Air, MD
    Posts
    148
    Thanks
    27
    Thanked 3 Times in 3 Posts
    Looking Good!

  10. #10
    There will be Blood! verified
    Join Date
    Sep 2010
    Owner Since
    1997

    Location
    In Sane!
    Posts
    4,677
    Thanks
    1,081
    Thanked 449 Times in 331 Posts
    Nice! Can't wait to see the finished product.

    Help them, for they know not that which they do not know!
    CoopKill's Mistress Makeover Thread!
    "Punk, Nutswinging, Small Time, Asshat, Monkey, Jerkoff, Loser that rides on other peoples accomplishments!" . .

Bookmarks

Posting Permissions

  • You may not post new threads
  • You may not post replies
  • You may not post attachments
  • You may not edit your posts
  •  
The 3000GT/Stealth/GTO Web History Project
3000gt.com
3000GT / Stealth International WWWboard Archive
Jim's (RED3KGT) Reststop
3000GT/Stealth/GTO Information and Resources
Team 3S
3000GT / Stealth / GTO Information
daveblack.net
3000GT/Stealth/GTO Clubs and Groups
Michigan 3S
MInnesota 3S
Wisconsin 3S
Iowa, Nebraska, Kansas 3S
North California 3000GT/Stealth
United Society of 3S Owners
3000GT/Stealth/GTO Forums
3000GT/Stealth International
3000GT/Stealth/GTO Event Pages
3S National Gathering
East Coast Gathering
Upper Mid-West Gathering
Blue Ridge Gathering